
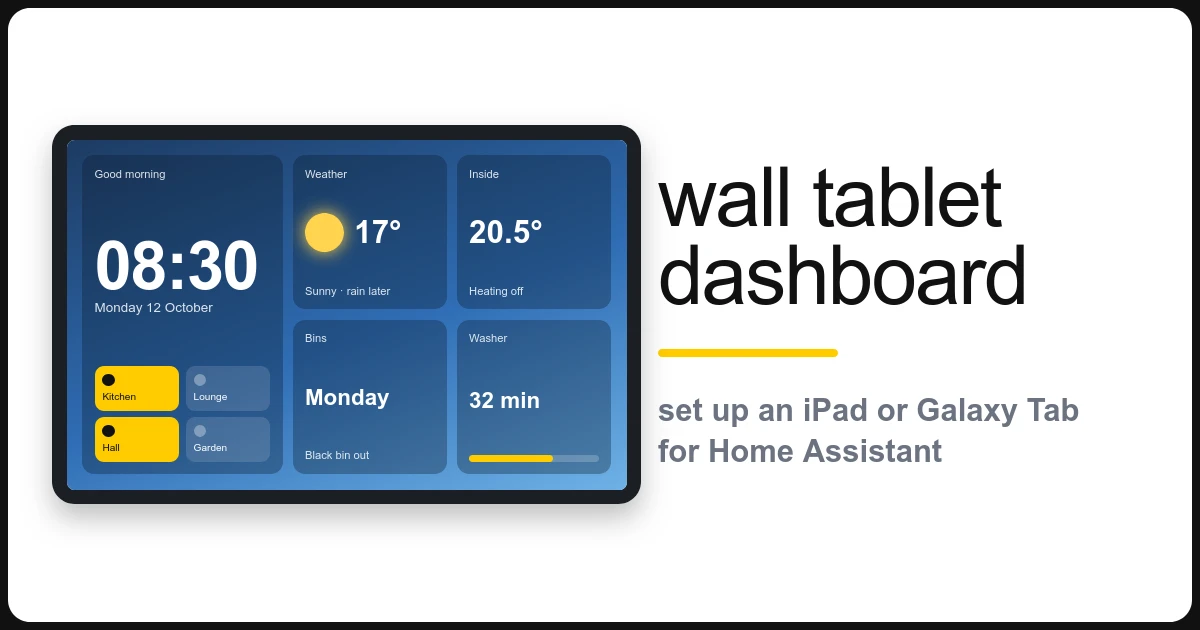
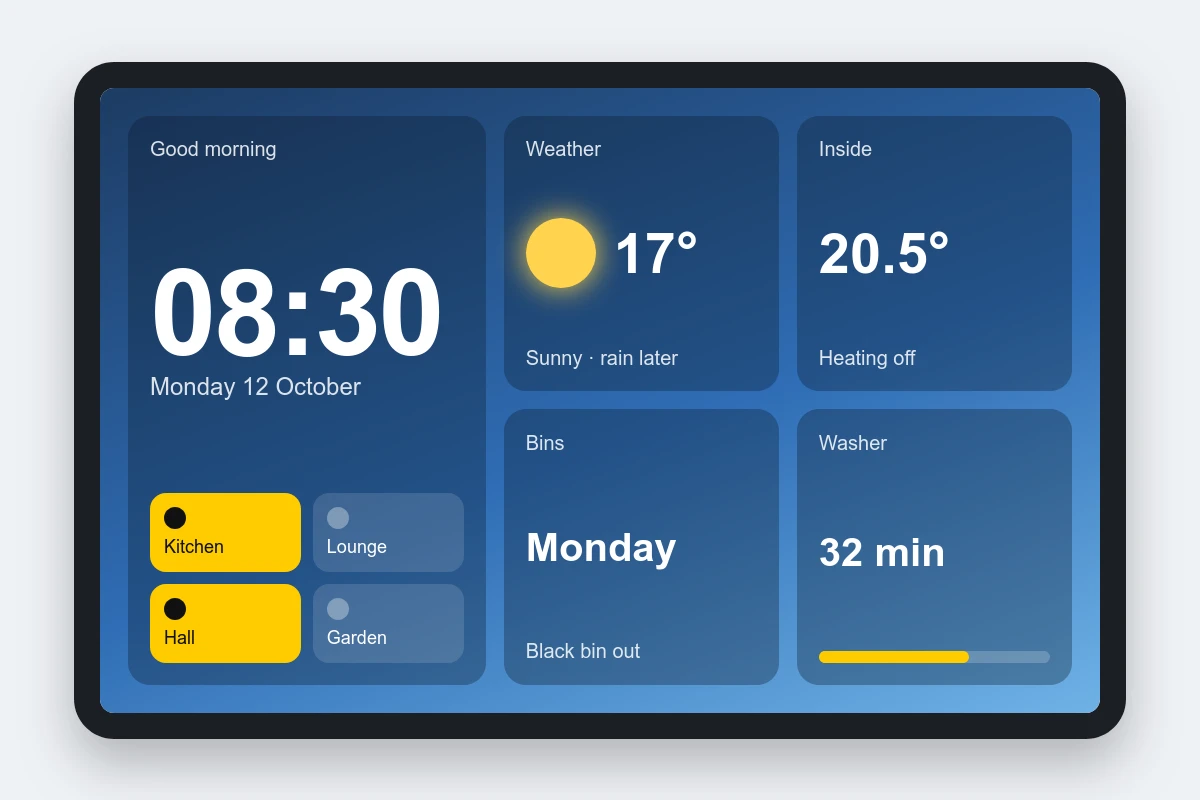
A tablet on the wall is the nicest way to use Home Assistant. Everyone in the house can see the time, the weather and what’s switched on, and turn things on and off without finding their phone. You don’t need special hardware: an ordinary iPad or Samsung Galaxy Tab does the job well, as long as you set it up properly so it stays on, stays logged in and doesn’t wander off into other apps.
This guide shows you how to set up a Home Assistant wall tablet step by step, for both iPad and Galaxy Tab, plus which tablet to buy if you haven’t got one yet. I run my own dashboards on iPads and a Samsung Galaxy Tab, and these are the exact settings I use.
Which tablet should you buy for a Home Assistant wall tablet?
Almost any recent tablet can show a dashboard. What matters for a screen that’s on all day is that it’s smooth with a busy dashboard, keeps getting updates, and copes with being plugged in 24/7. These are the ones I’d recommend (UK prices at the time of writing, October 2026):
| Tablet | Rough price | Why |
|---|---|---|
| Samsung Galaxy Tab A11+ (11″) | about £180 | My top pick for a wall. Fast enough for heavy dashboards, a good 11″ screen, long update support, and battery protection that stops charging at 80%. |
| Samsung Galaxy Tab A9+ (11″) | £120 or less | The budget pick. Fine for a simpler dashboard, with the same 80% battery protection. Only worth it on offer; much over £120 and the A11+ is better value. |
| iPad (A16, 11″) | about £329 | The smoothest of the lot, with years of updates. Great if you want an iPad you can also take off the wall, but expensive just for a dashboard. |
| Refurbished iPad (9th generation or newer, 10.2″) | about £120-£150 | Brilliant value. A refurbished 10.2″ iPad on a stand or wall mount makes a great dashboard. Buy from a seller with a warranty. |
What I’d avoid:
- No-name “Android 15” tablets from eBay or marketplaces. They’re slow, often 2.4 GHz Wi-Fi only, and some have been found with malware built into the firmware. Not something you want on your home network.
- Amazon Fire tablets. No Google Play Store, so getting a kiosk app on takes fiddly sideloading.
- Xiaomi and Redmi tablets. Good hardware, but their software is very aggressive about closing apps in the background, which fights against a kiosk app that should run forever.
- Very old tablets that no longer get updates. Fine for a quick try, but not for something on your network all day.
iPad or Galaxy Tab?
Both work well, but they behave differently:
- Galaxy Tab (Android) can run Fully Kiosk Browser, which lets Home Assistant control the tablet itself: turn the screen off at night, wake it when you walk past or when someone rings the doorbell, change the brightness and check the battery.
- iPad is smoother and simpler, and uses Apple’s built-in Guided Access to lock it to the Home Assistant app. The catch is that Home Assistant can’t switch the screen on and off.
If you’re buying new for a wall, I’d go Galaxy Tab. If you’ve already got an iPad, use it.
Part 1: Get Home Assistant ready (both tablets)
Do these two steps on your computer first. They make the tablet much easier to set up.
Step 1: Make a user for the tablet
Give the tablet its own login rather than using yours. If the tablet ever gets lost or broken you can just remove its user, and it means the tablet can’t change your Home Assistant settings.
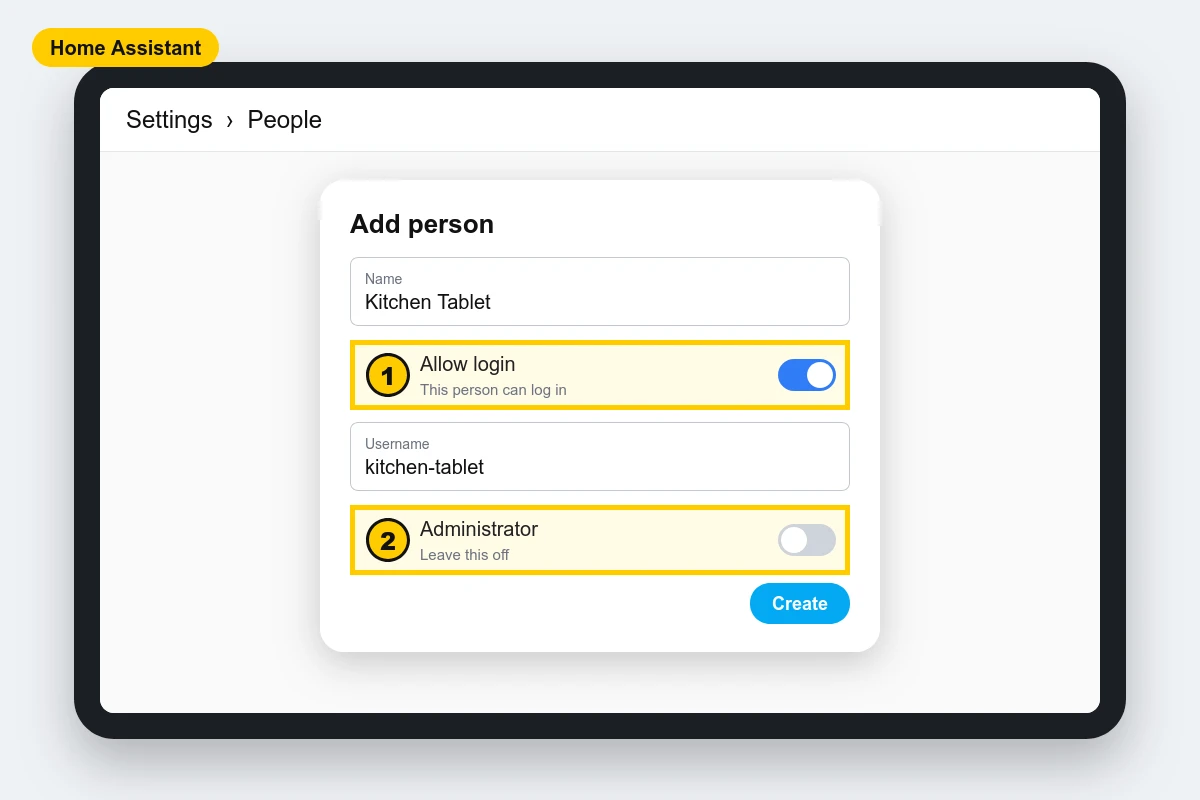
- Go to Settings → People and click Add person.
- Name it something like Kitchen Tablet and turn on Allow login (1).
- Pick a username and password.
- Leave Administrator off (2), then click Create.
Step 2: Choose the dashboard the tablet opens on
Make a dashboard just for the tablet (Settings → Dashboards → Add dashboard), or use one you already have. Big buttons and big text work best on a wall, since people look at it from across the room.
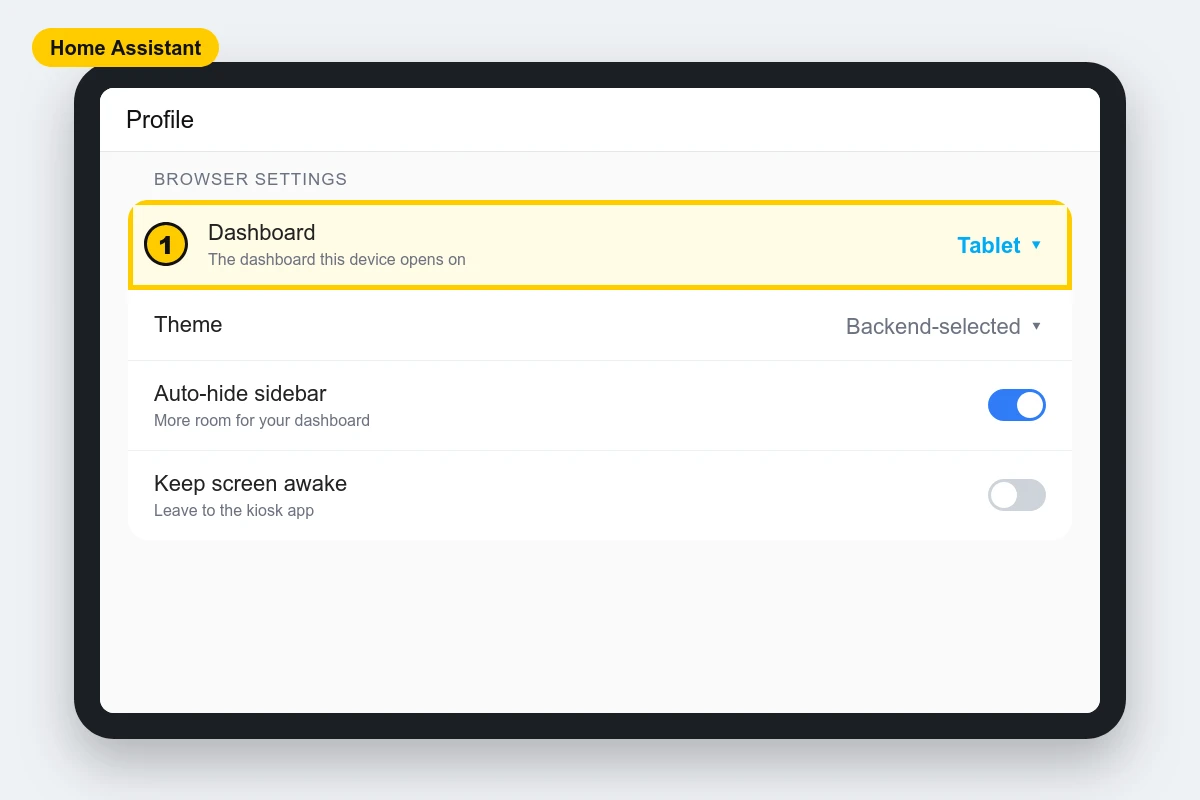
Once the tablet is logged in (Part 2 or 3), open your profile on the tablet by tapping the name at the bottom of the sidebar, and set Dashboard to the one you want (1). This setting is saved per device, so your phone keeps its normal dashboard.
Tip: give your Home Assistant server and the tablet fixed IP addresses. In your router’s settings this is usually called a DHCP reservation. Then the address in the next steps never changes.
Optional: the Kiosk Mode add-on from HACS hides Home Assistant’s top bar and sidebar on chosen dashboards, so the tablet shows nothing but your cards.
Part 2: Set up a Samsung Galaxy Tab
Step 3: Update it and connect to Wi-Fi
Do Part 1 first, then carry on from here.
Go through the first-time setup (you can skip the Samsung account), connect to your Wi-Fi, ideally the 5 GHz network, then run Settings → Software update until there’s nothing left to install.
Step 4: Turn on battery protection
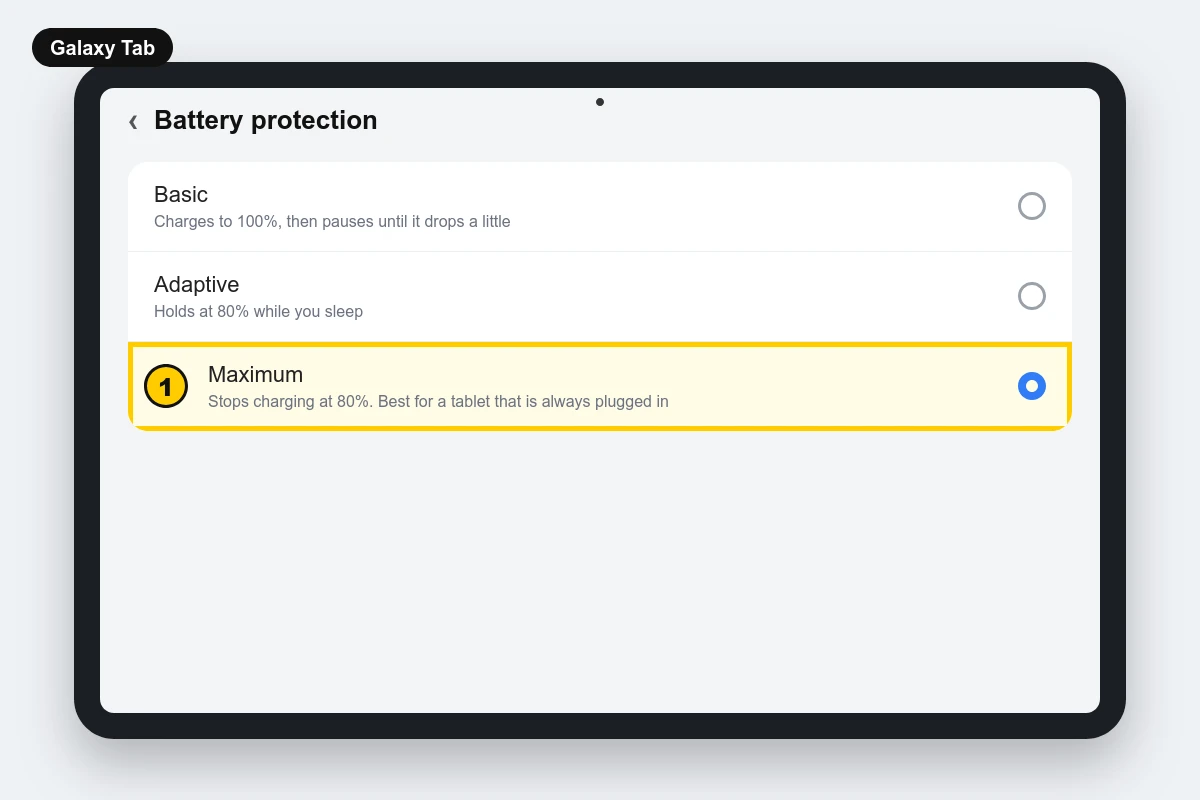
A wall tablet is plugged in all the time, and sitting at 100% charge wears a battery out fast. Samsung has a setting that stops charging at 80%.
Go to Settings → Battery → Battery protection and choose Maximum (1). On some versions it’s under Settings → Battery → More battery settings.
Step 5: Install Fully Kiosk Browser
Install Fully Kiosk Browser & App Lockdown from the Google Play Store. It’s a web browser made for wall screens: it shows one page full screen, keeps the screen on, starts by itself after a restart, and can lock the tablet so nobody can leave it.
The basic app is free to try. The extras in this guide marked PLUS (motion detection, remote control from Home Assistant, kiosk lock) need a one-off Plus licence, which is a few euros per tablet and you buy inside the app. I think it’s well worth it.
Step 6: Stop Samsung putting Fully to sleep
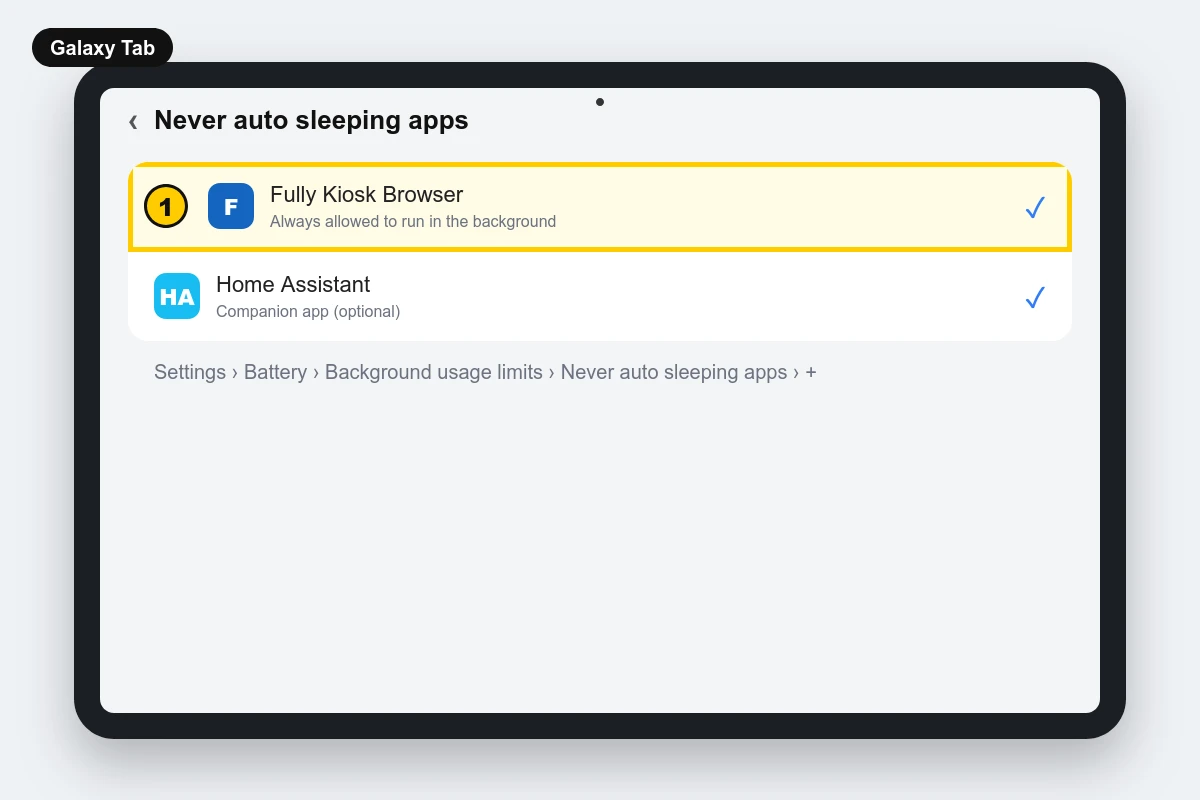
Samsung tablets close apps they think you’re not using. For a wall screen that means a blank tablet one morning. Two settings fix it:
- Settings → Battery → Background usage limits → Never auto sleeping apps, tap + and add Fully Kiosk Browser (1).
- Settings → Apps → Fully Kiosk Browser → Battery and choose Unrestricted.
Step 7: Point Fully at your dashboard
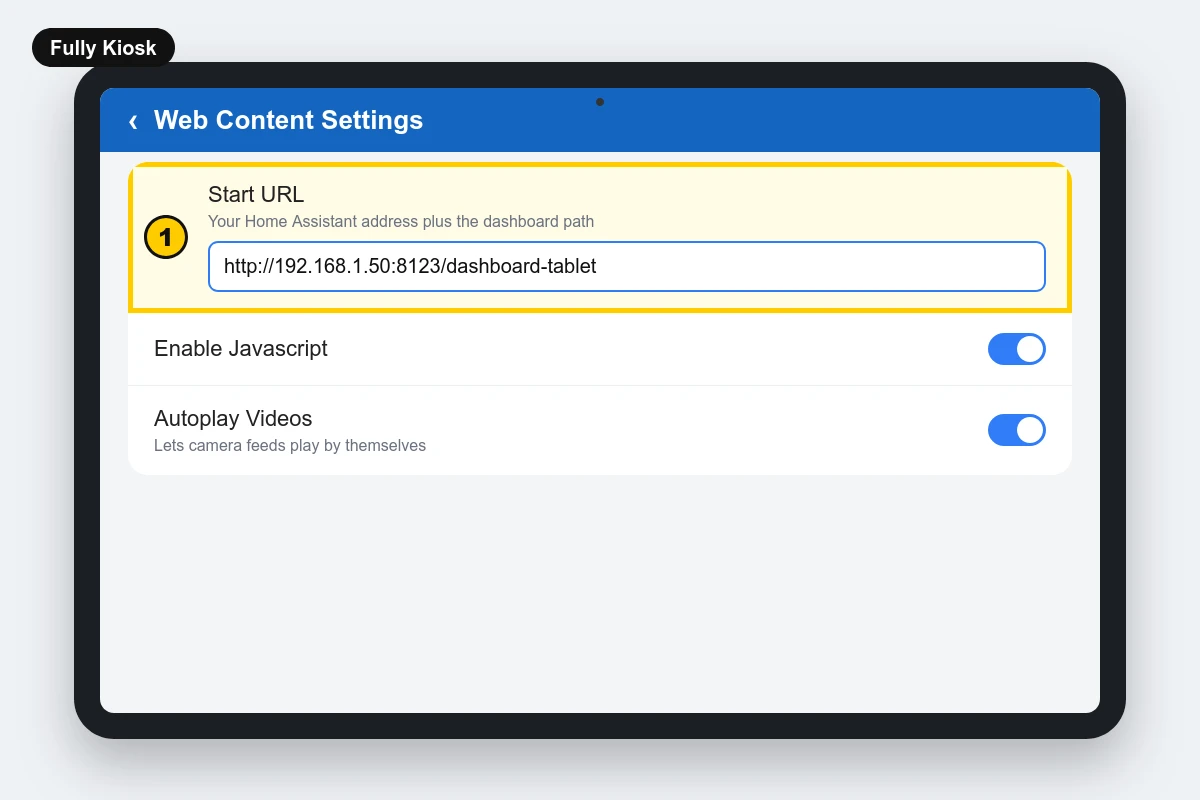
Open Fully, then swipe in from the left edge of the screen and tap Settings. Go to Web Content Settings → Start URL and type your Home Assistant address followed by the dashboard’s path (1). For example:
http://192.168.1.50:8123/dashboard-tabletSwap in your own server’s IP address. The path is whatever you see after the address when you open the dashboard in a browser. While you’re there, turn on Autoplay Videos if your dashboard shows cameras.
Step 8: Keep the screen on and start on boot
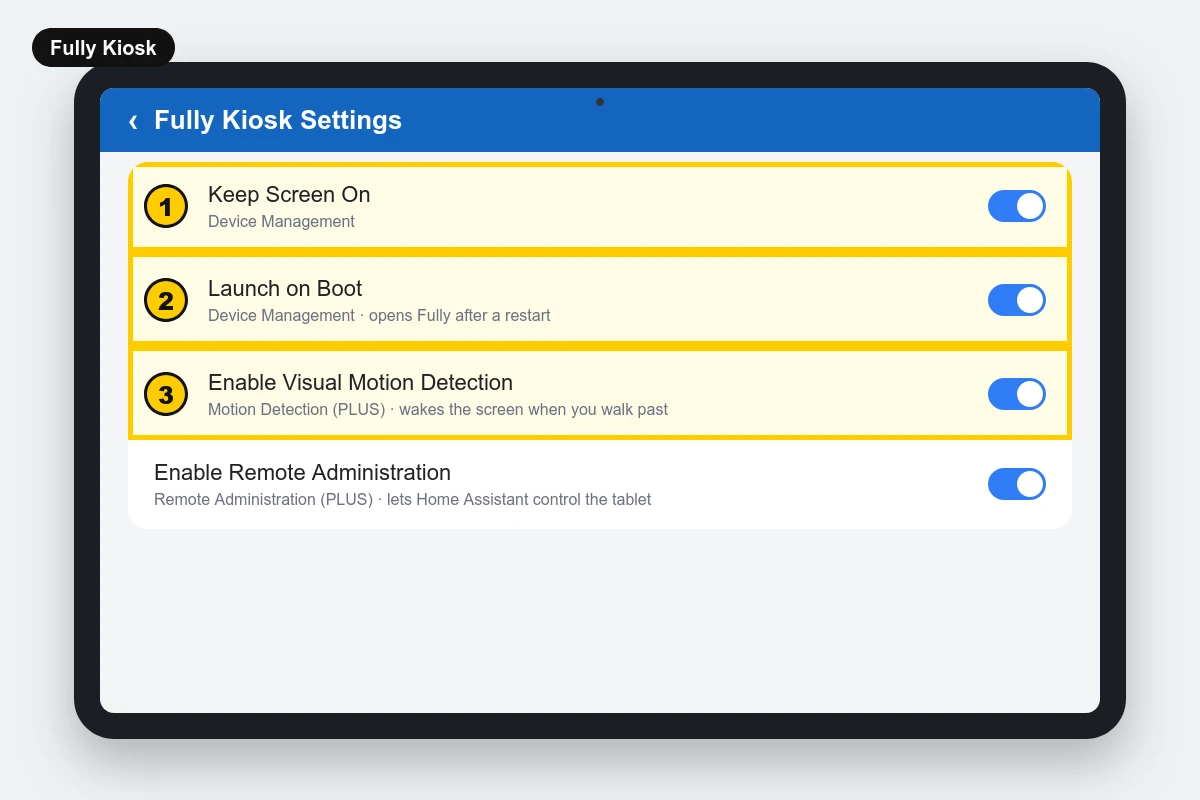
Still in Fully’s settings, turn on:
- Device Management → Keep Screen On, so the tablet doesn’t lock.
- Device Management → Launch on Boot, so Fully opens by itself after a power cut or update.
- Motion Detection → Enable Visual Motion Detection (PLUS, optional). Fully uses the front camera to spot movement and wakes the screen when you walk past.
If you want Home Assistant to control the tablet (Step 11), also turn on Remote Administration → Enable Remote Administration, set a Remote Admin Password, and tick Remote Admin from Local Network.
Step 9: Log in
Go back to the start page. Log in with the tablet user from Step 1 and tick Keep me logged in. Now set the tablet’s default dashboard as in Step 2.
Step 10: Lock it down (do this last)
When everything works, go to Kiosk Mode (PLUS) in Fully’s settings, set a Kiosk Exit PIN and turn on Enable Kiosk Mode. Now the home and back buttons are blocked and nobody can wander off into YouTube. To get back into the settings, swipe in from the left edge and enter your PIN.
Do this last, and write the PIN down. Locking yourself out of a tablet on the wall is no fun.
Step 11 (optional): Control the tablet from Home Assistant
With Remote Administration on, Home Assistant can see and control the tablet. Go to Settings → Devices & services → Add integration, search for Fully Kiosk Browser, and enter the tablet’s IP address and the Remote Admin Password from Step 8.
You get entities for the screen, brightness, battery, motion and more. For example, this automation turns the screen off at night and back on in the morning. Change switch.kitchen_tablet_screen to match your tablet’s name:
alias: Kitchen tablet screen night and day
triggers:
  - trigger: time
    at: "23:00:00"
    id: night
  - trigger: time
    at: "07:00:00"
    id: morning
actions:
  - choose:
      - conditions:
          - condition: trigger
            id: night
        sequence:
          - action: switch.turn_off
            target:
              entity_id: switch.kitchen_tablet_screen
    default:
      - action: switch.turn_on
        target:
          entity_id: switch.kitchen_tablet_screen
Paste it in Settings → Automations → Create automation → ⋮ → Edit in YAML.
Part 3: Set up an iPad
Do Part 1 first, then carry on from Step 3. iPads can’t run Fully Kiosk, but you don’t need it. The free Home Assistant app plus a couple of built-in settings do the same basic job.
Step 3: Update it and install the Home Assistant app
- Connect to Wi-Fi and install any updates in Settings → General → Software Update.
- Install Home Assistant from the App Store. It’s the official companion app and it’s free.
- Open it. It should find your Home Assistant server by itself. If it doesn’t, type the address, like
http://192.168.1.50:8123. - Log in with the tablet user from Part 1, then set the default dashboard as in Step 2.
The app is better than a Safari bookmark for a wall screen: it stays logged in, runs full screen, and adds the iPad’s battery level to Home Assistant, which you can use below.
Step 4: Stop the screen locking
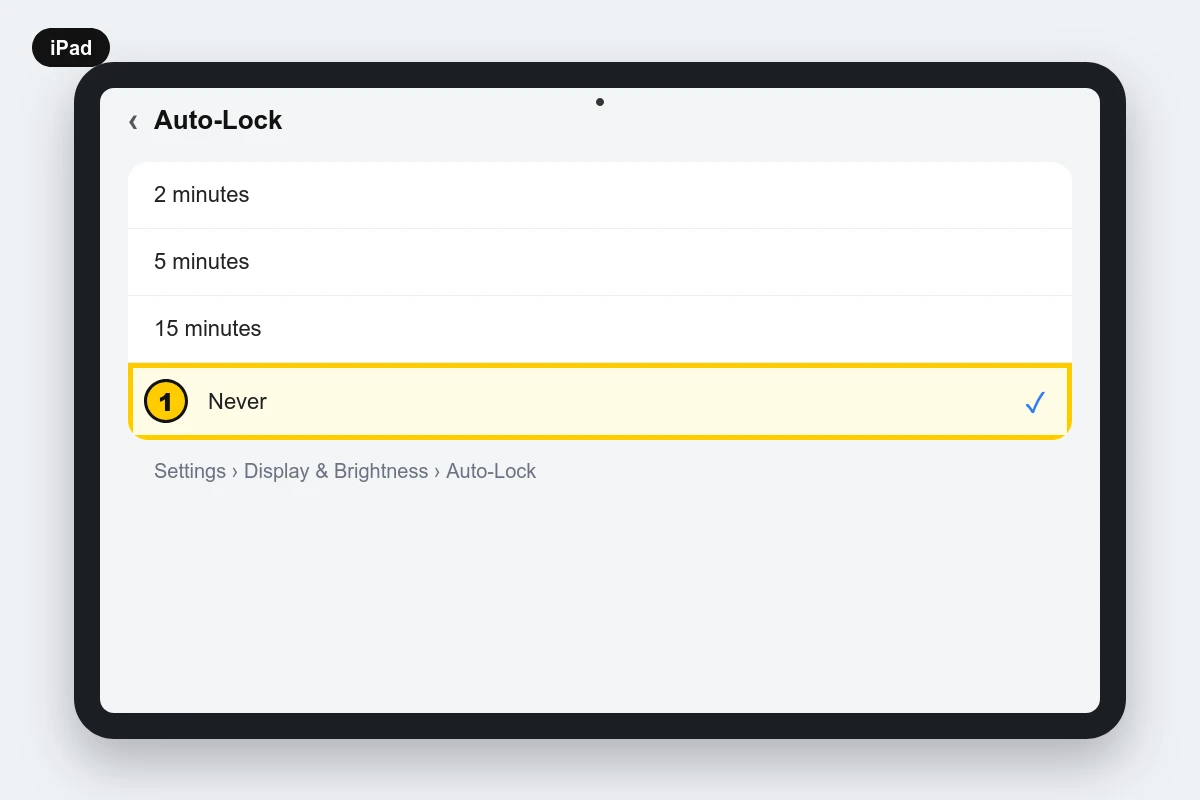
Go to Settings → Display & Brightness → Auto-Lock and choose Never (1). While you’re there, turn the brightness down a bit; a wall screen doesn’t need to be at full brightness.
Step 5: Lock the iPad to Home Assistant with Guided Access
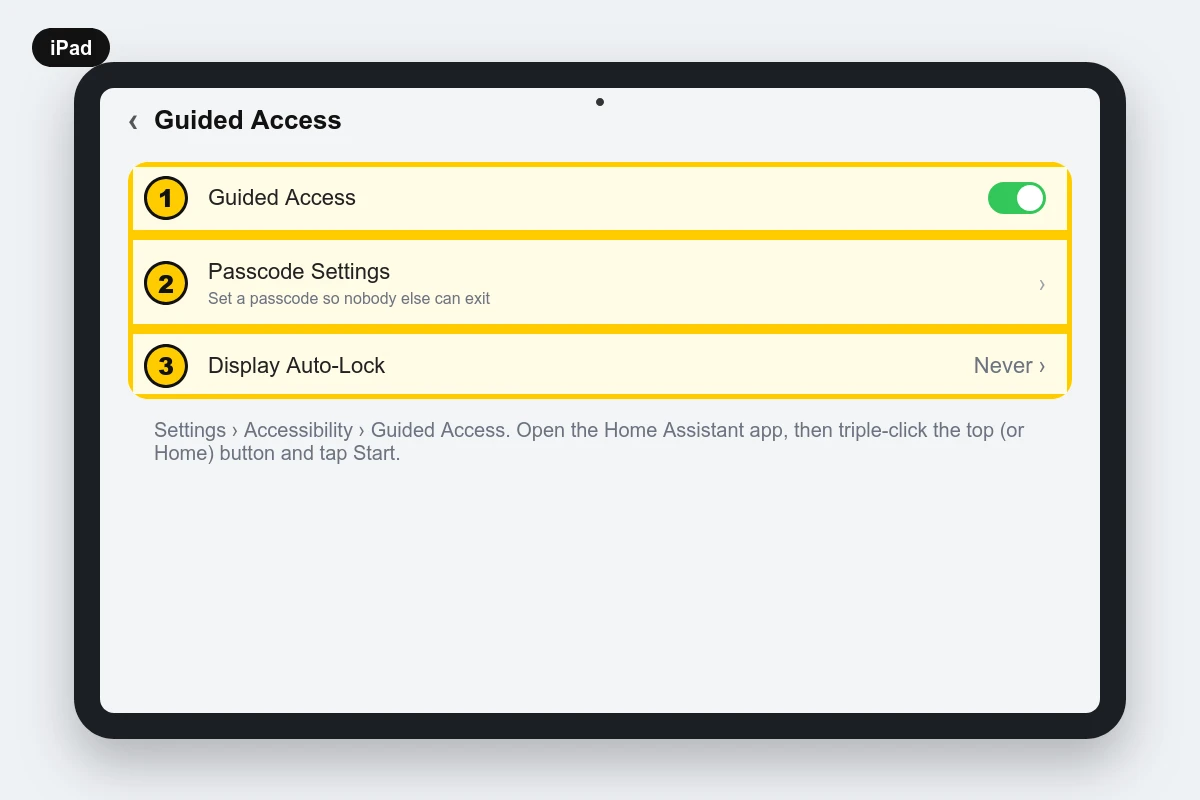
Guided Access is Apple’s built-in kiosk mode. It keeps the iPad inside one app until you enter a passcode.
- Go to Settings → Accessibility → Guided Access and turn it on (1).
- Tap Passcode Settings and set a passcode (2). Use a different one from the iPad’s own passcode.
- Set Display Auto-Lock to Never (3). Guided Access has its own auto-lock setting, separate from Step 4.
- Open the Home Assistant app, triple-click the top button (or the Home button on older iPads) and tap Start.
To leave Guided Access, triple-click again and enter the passcode.
Look after the iPad’s battery
Some newer iPads have an 80% charging limit under Settings → Battery. If yours does, turn it on. If not, plug the charger into a smart plug and let Home Assistant charge the iPad between 30% and 80%. This works for any tablet with the Home Assistant app. Change the two entity names to match yours:
alias: Kitchen iPad charging
triggers:
  - trigger: numeric_state
    entity_id: sensor.kitchen_ipad_battery_level
    below: 30
    id: charge
  - trigger: numeric_state
    entity_id: sensor.kitchen_ipad_battery_level
    above: 80
    id: stop
actions:
  - choose:
      - conditions:
          - condition: trigger
            id: charge
        sequence:
          - action: switch.turn_on
            target:
              entity_id: switch.kitchen_ipad_charger
    default:
      - action: switch.turn_off
        target:
          entity_id: switch.kitchen_ipad_charger
Part 4: Putting it on the wall
- Buy the mount after the tablet. Wall mounts are made for one exact model, so check yours fits before ordering.
- Try it on a stand first. Use it for a week on a kitchen worktop stand before drilling holes. You’ll soon find out where you actually look at it.
- Plan the cable. A long cable with a right-angled USB-C plug keeps it neat. A charger in a socket behind a cupboard or a flush USB wall socket hides it completely.
- Eye level and out of the sun. Around 1.5 m off the floor works for most people, and direct sunlight makes any screen hard to read.
- Landscape or portrait? Landscape suits most dashboards. Portrait looks great in a hallway but needs a dashboard designed for it.
Troubleshooting
- It keeps asking me to log in. Make sure you ticked Keep me logged in. Use Home Assistant’s local address (
http://IP:8123) on the tablet rather than a remote one behind an extra login page. - The Galaxy Tab shows a blank screen after a while. Samsung has put Fully to sleep. Recheck Step 6, both parts.
- The iPad still locks. Check Display Auto-Lock inside the Guided Access settings, not just the normal Auto-Lock.
- Cameras don’t play in Fully. Turn on Autoplay Videos in Web Content Settings.
- The dashboard looks wrong after a Home Assistant update. Reload the page. In Fully, swipe in from the left edge for the menu.
- I can’t find the PLUS settings in Fully. Check you installed Fully Kiosk Browser & App Lockdown by fully-kiosk.com and not a similar-named app.
What next?
Now the tablet’s on the wall, make the dashboard worth looking at. Here are some of the cards I’ve built for mine:
New to Home Assistant? Start with how to install Home Assistant with Docker Compose.
Thank you
Thanks to the team behind Fully Kiosk Browser, which makes Android tablets brilliant wall screens, and to the volunteers and the Open Home Foundation who build Home Assistant and its free companion apps.
If this guide helped you, consider buying me a coffee. It helps keep guides like this one coming.