
Use this at your own risk, and test it before relying on it, especially anything that controls a real device. Full disclaimer
Updated 8 November 2026
Want to see how your TrueNAS server is doing without opening TrueNAS? This free card puts it on your Home Assistant dashboard: your drives across the top, then CPU, memory, network and your pools, all on one screen. It only reads from the NAS, so nothing on the card can change anything.
This guide covers the TrueNAS Home Assistant card, NAS Bays: what it shows, how to install it from Marketplace (formerly HACS), and every setting.
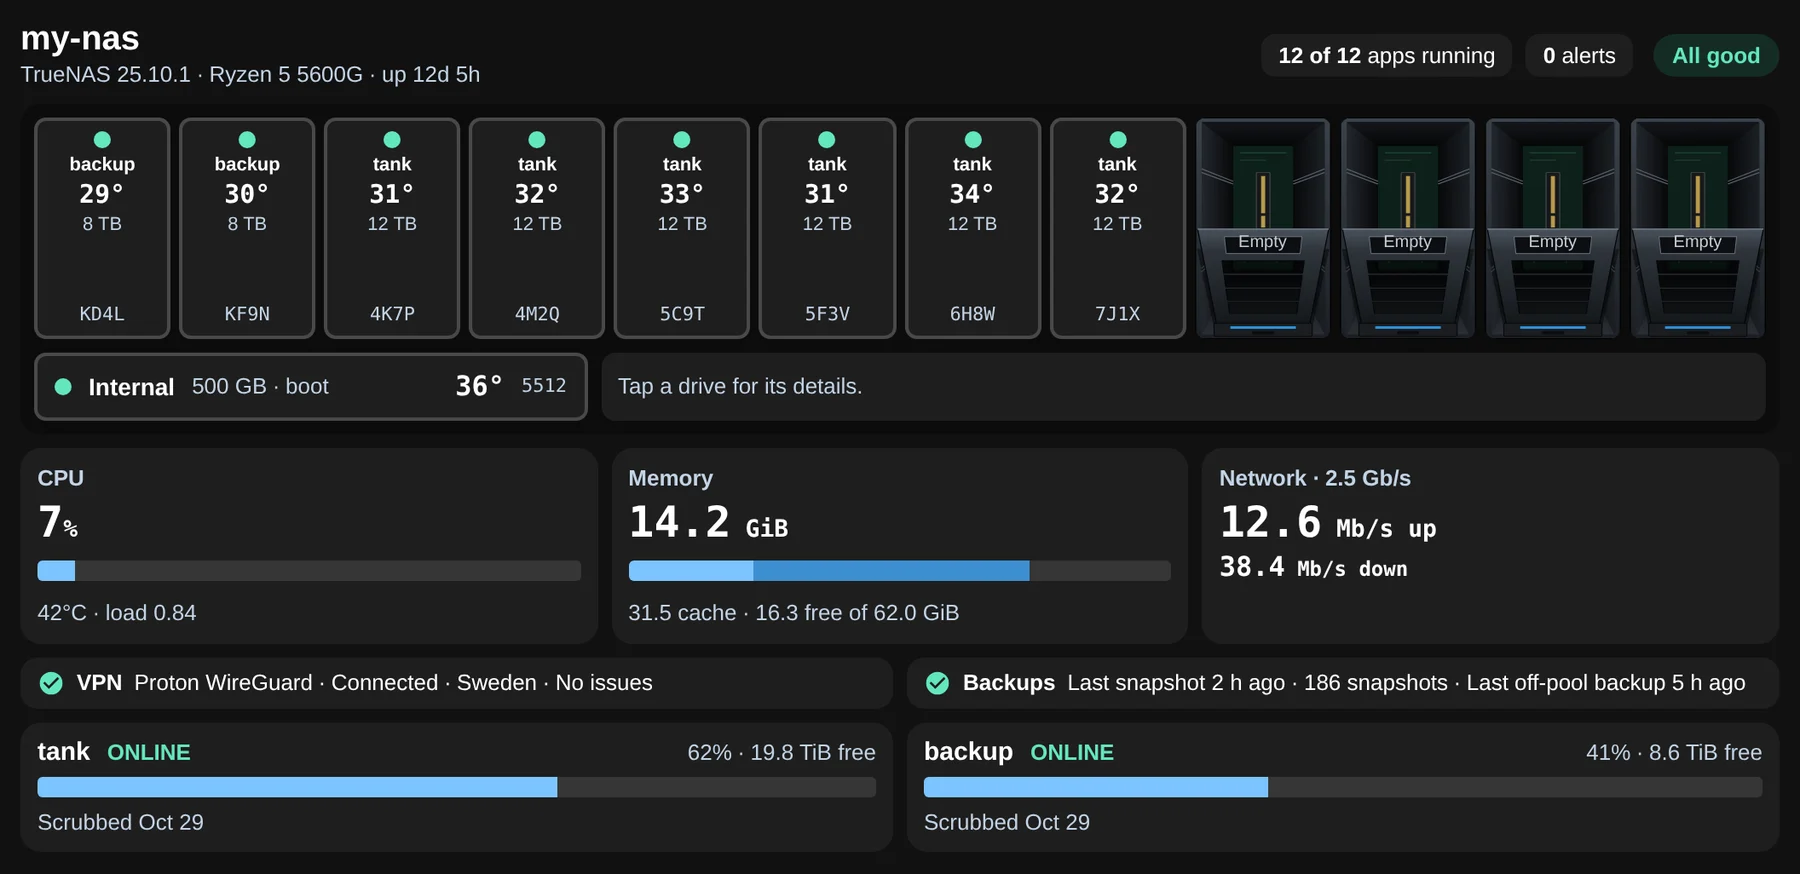
The free card. The server, drives and figures in these pictures are made up.
Beta: testers wanted
It runs every day on my own server with TrueNAS 27 RC.1 and Home Assistant 2026.10. It needs TrueNAS 25.10 or newer, but I haven’t tried those earlier versions. If you do, please open an issue on GitHub with what works and what doesn’t.
On this page (12 sections)
- 1What the card shows
- 2What you need for the TrueNAS Home Assistant card
- 3Step 1: Make a read-only account on TrueNAS
- 4Step 2: Install it from Marketplace (formerly HACS)
- 5Step 3: Connect it to your NAS
- 6Step 4: Add the card
- 7Matching your drive bays
- 8Settings
- 9Optional: the VPN line
- 10Want one designed for your own server?
- 11Good to know
- 12Frequently asked questions
What the card shows
- Drives: up to 12 bays across the top with health, temperature, size and the end of the serial. Tap one for its details.
- CPU, memory and network: the current figures and simple bars.
- Pools: status, how full, free space and the last scrub. It warns when a pool fills up or a scrub is overdue.
- Backups: the last snapshot, and whether replication, cloud or rsync tasks are set up and working. The line only appears if you have backup tasks.
- VPN (optional): one line saying whether your VPN is connected.
- 8 languages: English, Deutsch, Français, Italiano, Español, Nederlands, Polski and Português. It follows Home Assistant’s language, or you can pick one.
On a phone, the same things stack into one column.
What you need for the TrueNAS Home Assistant card
- TrueNAS 25.10 or newer
- Home Assistant 2026.9 or newer, with Marketplace (HACS before 2026.11) if you want the easy install
Step 1: Make a read-only account on TrueNAS
- In TrueNAS, go to Credentials → Users → Add. Give it a name such as
ha-monitor, and the Readonly Admin role. - Add an API key for that user and copy it. TrueNAS only shows it once.
Please don’t use your admin account. With a read-only account, nothing in Home Assistant can change your NAS.
Step 2: Install it from Marketplace (formerly HACS)
That button opens the card’s page in your own Marketplace. Click Install, then restart Home Assistant.
If the button doesn’t work, open Settings → Marketplace and click Add from link. Paste https://github.com/spikey1965/ha-nas-bays, choose the type Integration if asked, and install NAS Bays for TrueNAS. This asks you to connect GitHub.
The first time you use Marketplace, tick I understand the risks and agree and click Continue. On a version older than 2026.11? Marketplace is still called HACS there (what changed in 2026.11). The same steps work, with Download in place of Install and ⋮ → Custom repositories in place of Add from link.
Step 3: Connect it to your NAS
Go to Settings → Devices & services → Add integration → NAS Bays for TrueNAS, then enter the NAS’s address, its HTTPS port and the API key.
- It only connects over HTTPS, because TrueNAS revokes API keys that are sent over plain HTTP.
- If you use TrueNAS’s default self-signed certificate, untick the certificate check.
Step 4: Add the card
Go to Edit dashboard → Add card → NAS Bays, or use this YAML. The integration provides the card, so there’s nothing else to install.
type: custom:nas-bays-cardMatching your drive bays
TrueNAS can’t tell which physical bay a drive is in, so drives fill the bays in order. To match your case, open the card’s settings and pick the drive for each bay, using the serial on its label. You can also change the number of bays.
Always check the serial on the drive before you pull it. Don’t go by its position on the card alone.
Settings
Everything in the card’s settings can also be set in YAML.
| Option | Default | What it does |
|---|---|---|
mode |
full | compact gives a small summary card |
theme |
auto | light for dark text, dark for white text |
language |
Home Assistant’s | en, de, fr, it, es, nl, pl or pt |
name |
NAS’s hostname | The title on the card |
bays |
12 | How many bays to show |
slots |
automatic | Drive serials in bay order |
hide |
none | Any of cpu, memory, network, vpn, backups, storage |
max_width |
1100 | Widest the card gets, in pixels. 0 fills the space |
fill |
false | Stretch the card to the bottom of the screen, for wall tablets. Not on phones |
pool_names |
none | Shorter pool names for the drive bays |
temp_warn |
50 | Drive temperature, in °C, shown in amber |
scrub_warn_days |
45 | Days since the last scrub before it’s marked overdue |
snapshot_warn_hours |
48 | Hours since the last snapshot before Backups warns |
warn_no_replication |
false | Warn when there’s no replication, cloud or rsync task. This also keeps the Backups line showing when nothing is set up |
vpn_entity |
none | A sensor for the VPN line |
vpn_label |
none | The text on the VPN line |
Optional: the VPN line
The line can read any Home Assistant sensor, and it counts as connected when the sensor’s state is connected or on.
If you use Gluetun, a small helper script in the GitHub repo sends its status to Home Assistant. It reads the provider, VPN type and country from your Gluetun settings, so it shows your own VPN without any extra setup. The README has the steps.
“Connected” means Gluetun’s own health check is passing. It isn’t a separate test from outside your network.
Want one designed for your own server?
The free card stays simple on purpose. I can also design one to match your actual server, with your own case layout and the extra detail you want. This is an example: 12 vertical bays with realistic open empty bays, each drive’s type and hours powered on, a CPU gauge with per-thread bars, a memory chart, an hour of network traffic, a VPN radar and fuller pool details.
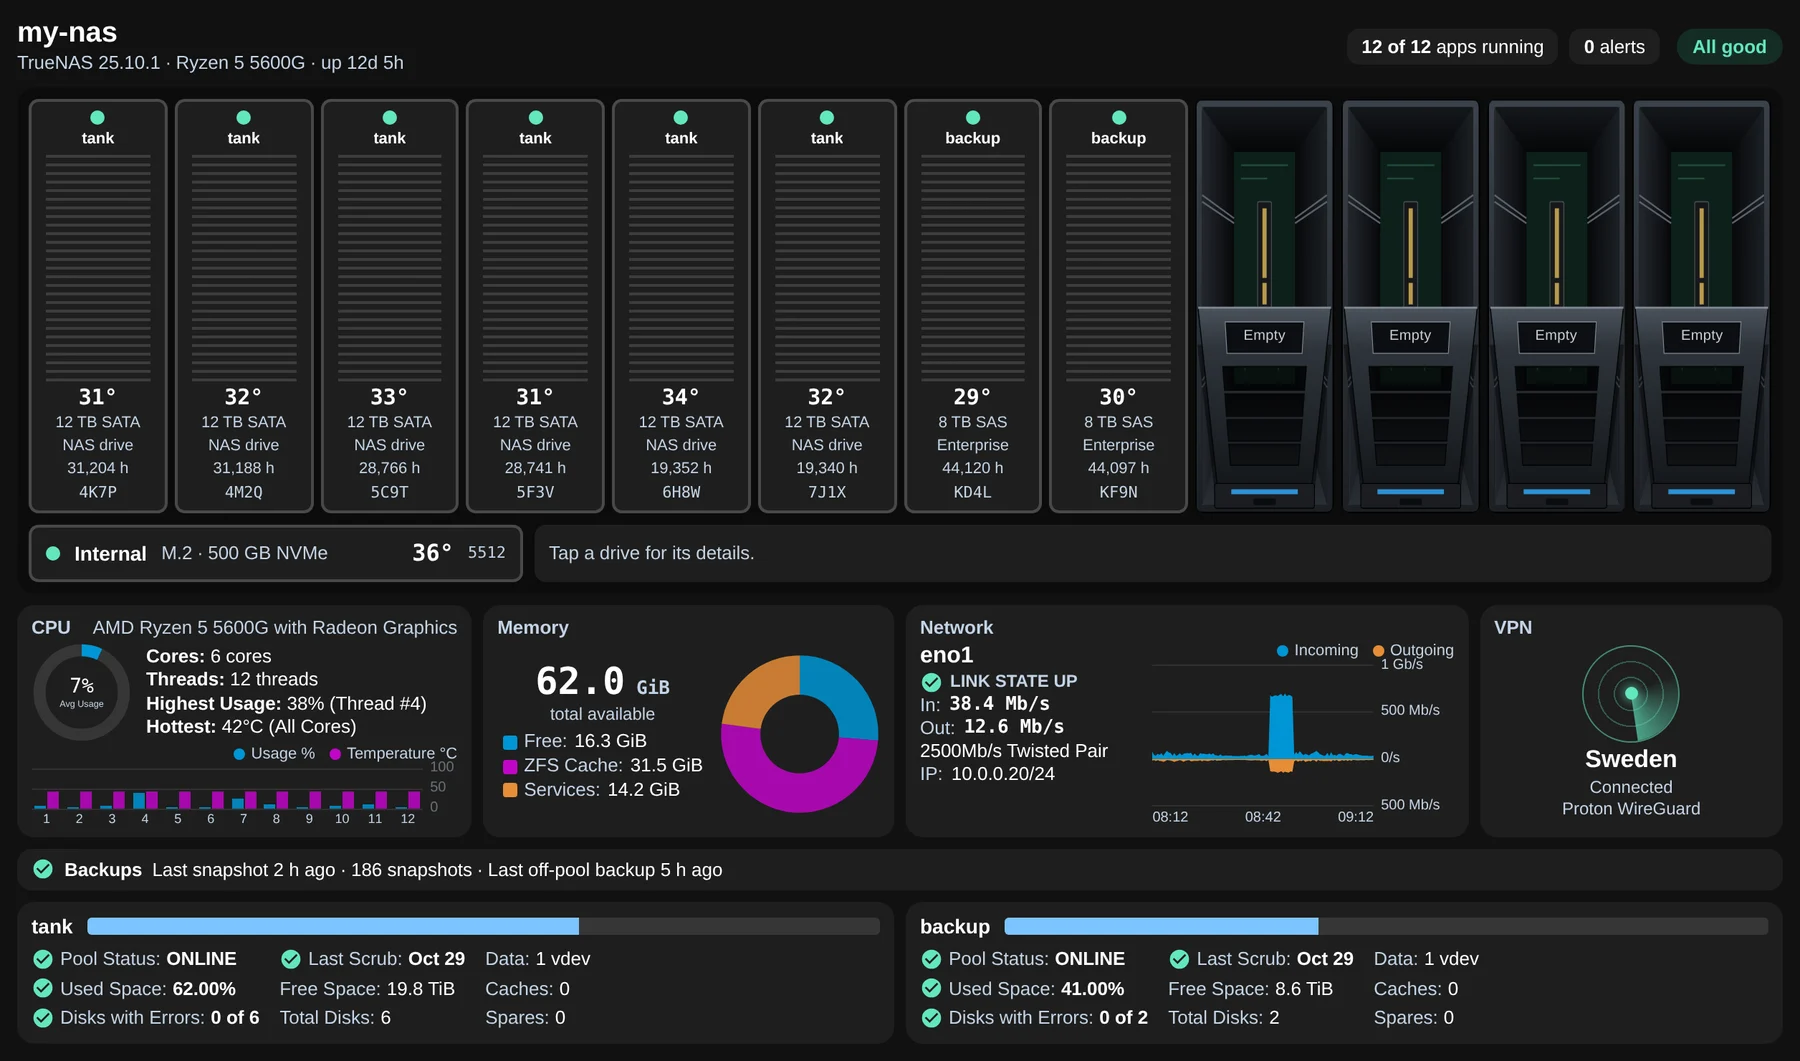
An example custom design. This isn’t in the free card.
First draft in up to 24 hours once you’ve sent your drive list and accepted the quote.
Good to know
- Figures update every 30 seconds, so it isn’t live to the second.
- Network speeds add up all ports that have a link.
- The translations are machine-made, and messages from TrueNAS itself stay in English. Spotted a wrong word? Please open an issue on GitHub.
- TrueNAS is a trademark of its owner. This card isn’t connected to or endorsed by iXsystems.
Found a bug or have an idea? Open an issue on GitHub.
Related guides: Install Home Assistant, Home Assistant wall tablet, TrueNAS 27 RC.1: what’s new.
If this card saves you time, consider buying me a coffee. It helps keep cards like this one coming.
Frequently asked questions
Which TrueNAS versions does the card work with?
TrueNAS 25.10 or newer, with Home Assistant 2026.9 or newer. I run it every day on TrueNAS 27 RC.1.
Can the card change anything on my NAS?
No. It only reads, and you connect it with an account that has the Readonly Admin role, so nothing in Home Assistant can change your NAS.
Why does it only connect over HTTPS?
TrueNAS revokes API keys that are sent over plain HTTP. If you use TrueNAS's default self-signed certificate, untick the certificate check.
Why are my drives in the wrong bays?
TrueNAS can't tell which physical bay a drive is in, so drives fill the bays in order. Open the card's settings and pick the drive for each bay using the serial on its label.
Get new guides by email
About one email a month: new step-by-step guides and card releases. No spam, unsubscribe any time.