

Follow this guide at your own risk, and back up your data first. Full disclaimer
Updated 30 October 2026 Tested with: Traefik 3.7.17 and cloudflared 2026.10.7
Cloudflare Tunnel lets you open your apps from anywhere, like radarr.yourdomain.com on your phone, without opening a single port on your router. A small program called cloudflared connects out from your home to Cloudflare, and visitors come in through that connection. Traefik then looks at the address they typed and sends them to the right app.
This guide sets up Cloudflare Tunnel with Traefik using Docker Compose, in five short steps. It takes about 25 minutes.
On this page (11 sections)
See how it works
Press Visit radarr.yourdomain.com and follow the request. Then press Try your home IP, and switch the tunnel off. Under the demo is the generator you’ll use in Step 1.
Open the generator full screen
What you need
- A computer or NAS running Docker. New to Docker? My Docker install guide covers Windows, Mac and Linux.
- A domain name using Cloudflare’s nameservers. A free Cloudflare account is enough.
Step 1: Make your files
In the generator, type your domain. Leave just Test page ticked for now. Then on your server:
- Make a folder, with a
configfolder inside it:mkdir -p ~/traefik/config && cd ~/traefik - Save the generator’s compose.yaml and .env in
~/traefik. - Save dynamic.yml in
~/traefik/config.
Don’t start anything yet. The .env file needs your tunnel token from Step 2.
Step 2: Create the tunnel
- Log in to one.dash.cloudflare.com and pick your account.
- Go to Networks → Tunnels and click Create a tunnel.
- Choose Cloudflared, give it a name (for example
home) and save. - Cloudflare shows an install command. Copy the long code after
--token. That’s your tunnel token. - Paste it into
.env, afterTUNNEL_TOKEN=.
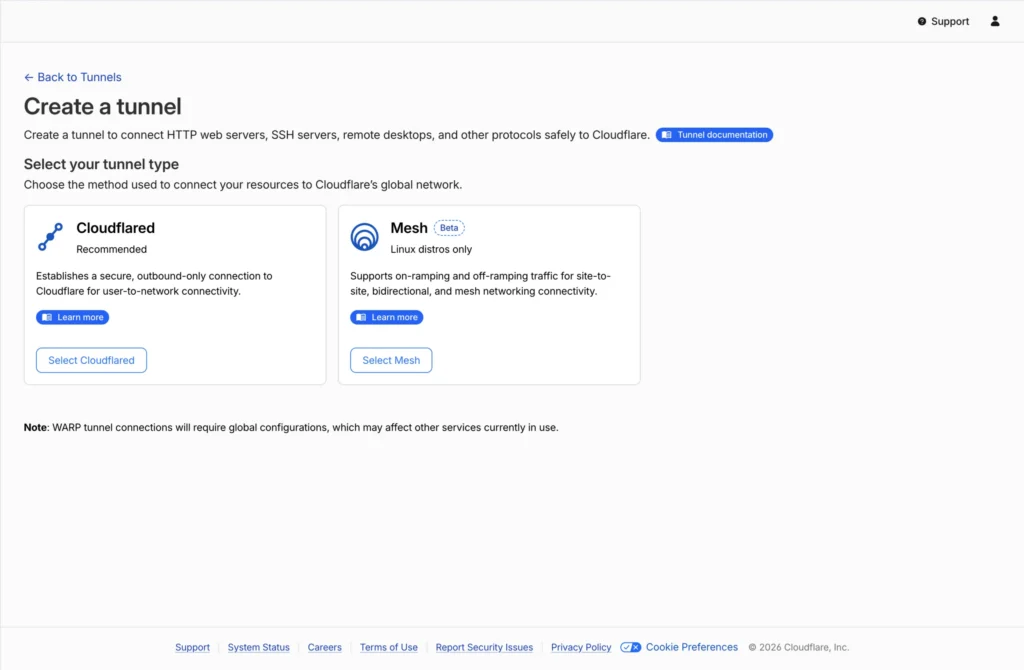
You don’t need to install anything Cloudflare suggests on that page. The cloudflared container in your compose file does the same job.
Step 3: Start it
Run the commands from the generator’s Commands tab. They end with:
docker compose up -d
docker compose logs cloudflared | tail -5
Look for Registered tunnel connection in the log. Back in Cloudflare, your tunnel now shows as Healthy.
Step 4: Add a route in Cloudflare
A route tells Cloudflare which addresses go down your tunnel. Open your tunnel, go to Published application routes and click Add a published application route:
- Subdomain:
test - Domain: your domain
- Service type: HTTP
- URL:
localhost:8000 - Click Save.
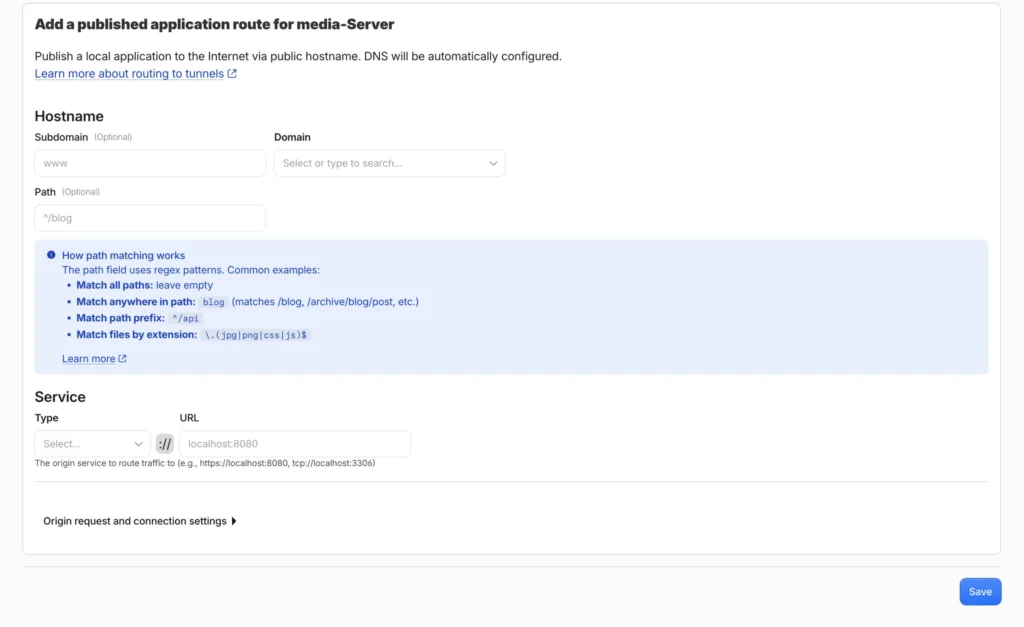
Every route points at the same place, localhost:8000, which is Traefik. Traefik then picks the app. Cloudflare also creates the DNS record for you. The Cloudflare routes tab in the generator lists every route you need.
Step 5: Test it
On your phone, with Wi-Fi turned off, open https://test.yourdomain.com. You should see a plain page of text from the test container. Look for X-Forwarded-For: it shows your phone’s real IP address, which means your apps will see real visitor addresses too. It’s working. 🎉
Once your real apps are working, remove the test page: delete the whoami part of compose.yaml and its route in Cloudflare.
Adding another app
- Tick the app in the generator and copy its lines from dynamic.yml into your
config/dynamic.yml. Traefik picks them up as soon as you save, with no restart. - Add its route in Cloudflare, like Step 4: for example
radarr→ HTTP →localhost:8000.
The generator assumes each app is reachable on your server at the port shown. Most apps in my guides are.
Optional: a real certificate at home
Visitors from the internet always get Cloudflare’s certificate. If you also want https:// with no warning when you’re at home, tick Also get a real certificate in the generator. You’ll need:
- A Cloudflare API token: go to My Profile → API Tokens → Create Token, use the Edit zone DNS template, and choose your domain. Paste it into
.env. - A way for your home network to find your server by name, such as a DNS rewrite for
*.yourdomain.comin AdGuard Home.
Then open https://radarr.yourdomain.com:8443 at home.
If something’s wrong
- The tunnel shows as Inactive or Down. The token is wrong or missing. Check
.env, then rundocker compose up -dagain. - “Error 1033”. Cloudflare can’t reach cloudflared. Check
docker compose psanddocker compose logs cloudflared. - “404 page not found”. That page comes from Traefik: it got the visit but has no matching route. Check the
Host(...)address in dynamic.yml matches the Cloudflare route exactly. - “Bad Gateway”. Traefik can’t reach the app. Check the app is running and the port in dynamic.yml is right.
- Home Assistant says “400: Bad Request”. Add
use_x_forwarded_for: trueandtrusted_proxies: 127.0.0.1underhttp:in its configuration.yaml, then restart it. - “Too many redirects”. The app is set to force HTTPS by itself. Turn that off in the app: Cloudflare already handles HTTPS.
Updating
cd ~/traefik
docker compose pull && docker compose up -d
Frequently asked questions
Do I need to open ports for a Cloudflare Tunnel?
No. cloudflared connects out from your home to Cloudflare, and visitors come in through that connection, so no ports are opened on your router.
Can I stream Plex or Jellyfin through a Cloudflare Tunnel?
You shouldn't. Streaming video through Cloudflare's free network breaks its terms. Use Plex's own remote access, or a VPN such as Tailscale for Jellyfin.
What does "404 page not found" mean?
That page comes from Traefik: it got the visit but has no matching route. Check that the Host(...) address in dynamic.yml matches the Cloudflare route exactly.
Why does Home Assistant say "400: Bad Request" through the tunnel?
Add use_x_forwarded_for: true and trusted_proxies: 127.0.0.1 under http: in its configuration.yaml, then restart it.
Thank you
Traefik is open source, made by Traefik Labs and its community. cloudflared is open source too, and Cloudflare lets home users run tunnels for free.
Next in this series: Authentik, to put one login, with a code from your phone, in front of all your apps.
If this guide helped you, consider buying me a coffee. It helps keep guides like this one coming.
Get new guides by email
About one email a month: new step-by-step guides and card releases. No spam, unsubscribe any time.
 spikey1965