
For educational purposes only. This guide shows how to install self-hosted software on your own hardware. I don't condone piracy: only use these apps with media you own or have the right to use, and follow the law where you live. Back up your data first. Full disclaimer
Updated 16 November 2026 Tested with: Gotify 3.1.1 and iGotify 1.6
Gotify is a small, free notification server you run yourself. Your apps send it a message (“film downloaded”, “virus found”, “washing’s done”) and it pops up on your phone a second later. There are no accounts with anyone else, no monthly fee, and nothing about your server leaves your home, unless you use an iPhone (more on that below).
This guide sets up Gotify with Docker Compose in five short steps, then gets the messages onto your phone: the Gotify app on Android, or iGotify on iPhone. It takes about 20 minutes.
On this page (12 sections)
- 1Watch: install Gotify with Docker Compose
- 2See where a Gotify message goes
- 3What you need to set up Gotify with Docker Compose
- 4Step 1: Make your compose file
- 5Step 2: Start it and sign in
- 6Step 3: Make an app and send your first message
- 7Step 4: Get the messages on your phone
- 8Step 5: Connect your apps
- 9Away from home
- 10If something’s wrong
- 11Updating Gotify
- 12Frequently asked questions
Watch: install Gotify with Docker Compose
The video has subtitles at the bottom and no sound. It was recorded on a clean test install of Gotify 3.1.1, and the test message was really sent with curl. The token shown belongs to the test install, which has since been deleted.
See where a Gotify message goes
Pick who sends a message and what phone you have, then press Send. Try locking the phone, going out, and on iPhone, switching iGotify off. Under the demo is the generator you’ll use in Step 1.
Open the generator full screen
What you need to set up Gotify with Docker Compose
- A computer or NAS running Docker. New to Docker? My Docker install guide covers Windows, Mac and Linux.
- An Android phone or an iPhone.
- For notifications away from home: a way to reach your server from outside, like a Cloudflare Tunnel. On iPhone you need this even at home, because the app signs in through it.
gtfya.. A client is anything that reads them, like your phone. Gotify makes those for you when you sign in.Step 1: Make your compose file
In the generator above, pick Android or iPhone, then fill in Your server. The defaults work for most people. If you’re not sure of your PUID and PGID, run id on your server and use the two numbers it shows.
Make a new folder, for example ~/gotify, and save the compose.yaml and .env tabs into it. Then open .env and put a strong password after GOTIFY_PASS=.
For iPhone, there’s one more choice: External or Local. External is easier, because the app sets itself up, but iGotify needs its own public address as well as Gotify’s. Local keeps iGotify private, and you paste two tokens from the app into .env instead. Both work the same once they’re set up.
Step 2: Start it and sign in
Run the lines from the Commands tab in the same folder. They make the data folders, give them to your user, and start everything:
sudo mkdir -p /opt/arr/config/gotify
sudo chown -R 1000:1000 /opt/arr/config/gotify
docker compose up -d
Open http://your-server-ip:8680 and sign in as admin with your GOTIFY_PASS.
GOTIFY_PASS is only read the very first time Gotify starts. Changing it in .env afterwards does nothing. To change it, click ADMIN at the top right, then Settings.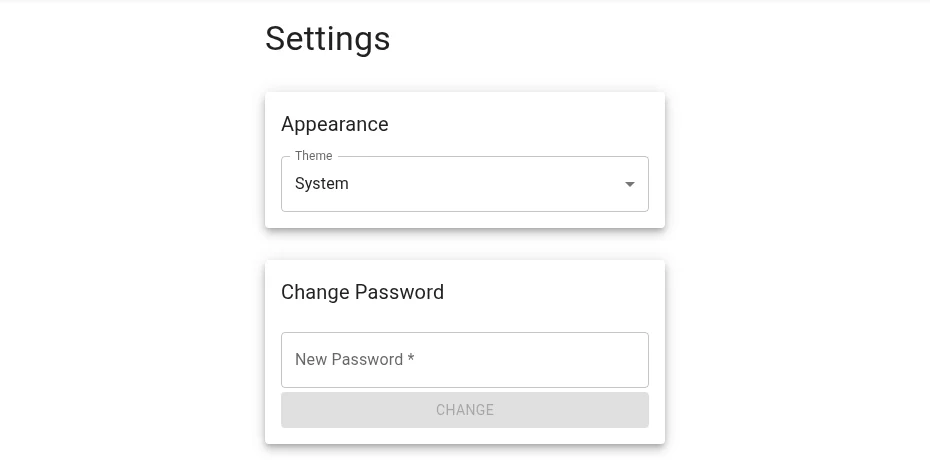
Step 3: Make an app and send your first message
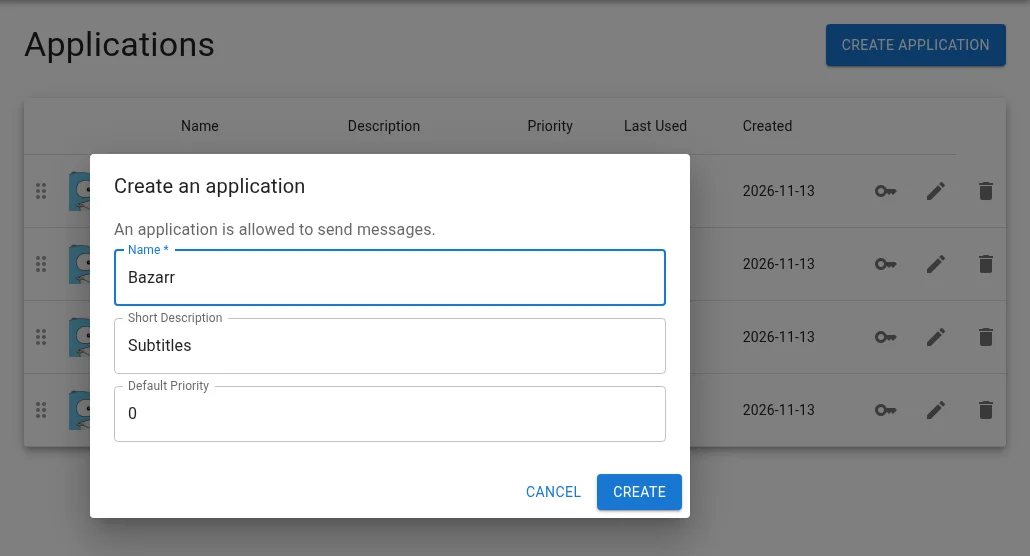
Click APPS at the top, then Create Application. Give it a name, like Test, and click Create.
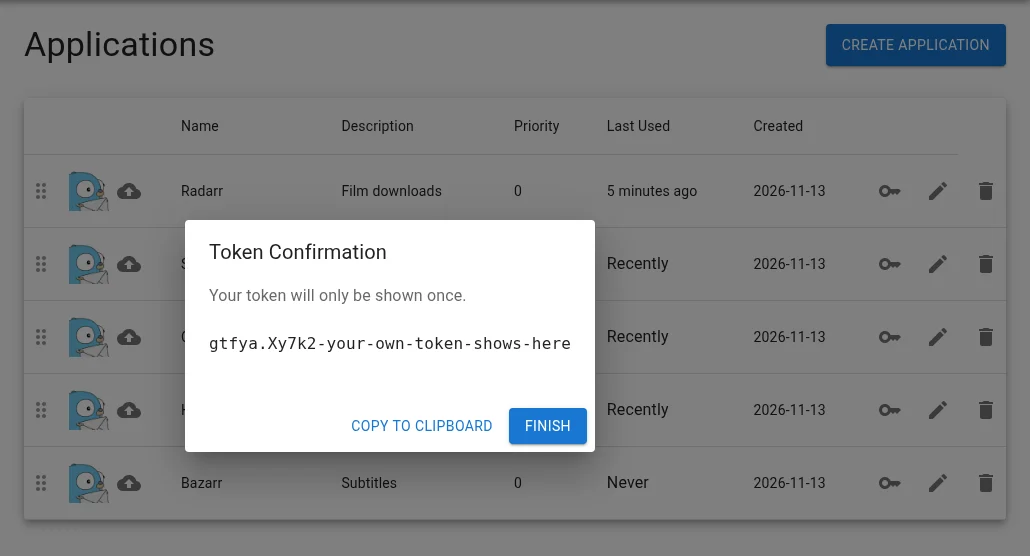
Gotify now shows the app’s token. Copy it straight away: it’s only shown once. In Gotify 3, the key button next to an app doesn’t show the token again. It makes a new one and the old one stops working.
Now send a message from your server, swapping in your own token:
curl "http://your-server-ip:8680/message?token=YOUR_APP_TOKEN" \
  -F "title=Hello" -F "message=My first Gotify message" -F "priority=5"
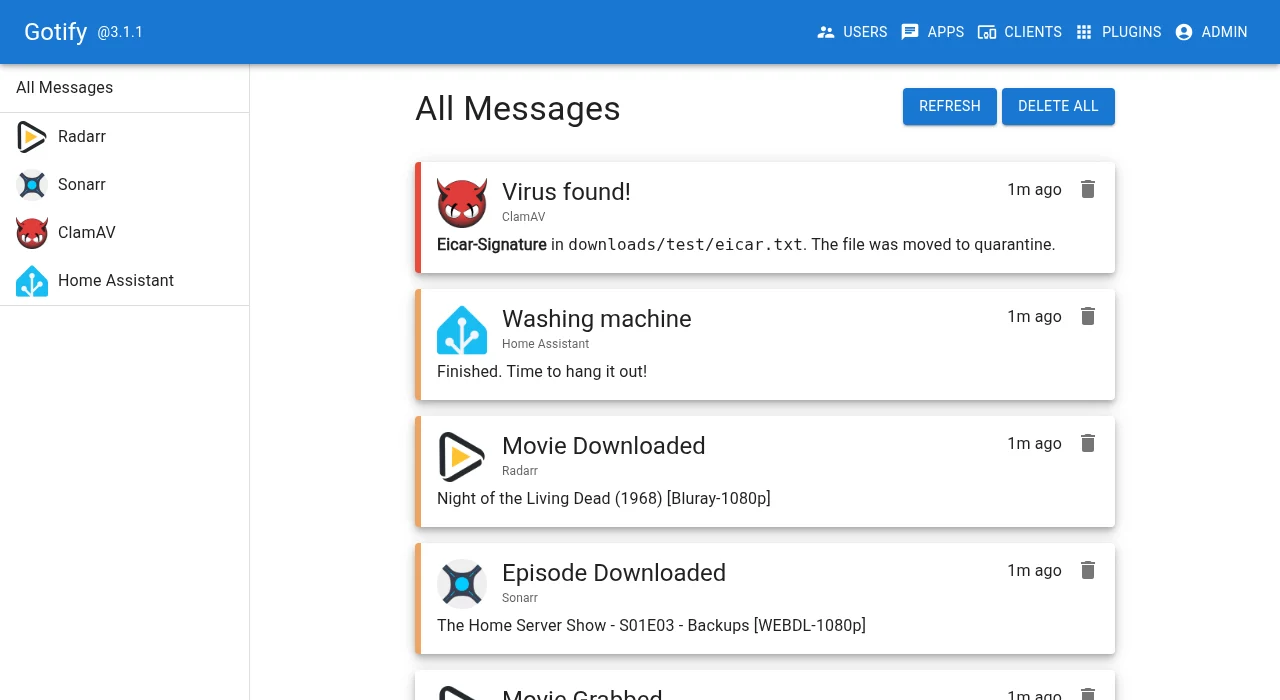
It appears in Gotify’s web page straight away. The Test message tab in the generator has the same line with your own address, plus a version for Windows PowerShell.
Step 4: Get the messages on your phone
Android
- Install Gotify from Google Play or F-Droid. It’s the official app, free, made by the same people as Gotify. You can also download the APK from GitHub.
- Type your Gotify address. At home that’s
http://your-server-ip:8680. To get messages when you’re out too, use your public address instead (see Away from home). - Sign in as admin with your password, and allow notifications.
- Turn off battery saving for it: Settings → Apps → Gotify → Battery → Unrestricted. Otherwise Android may put it to sleep, and messages arrive late.
The app shows a small “connected” notification all the time. That’s how it keeps listening. You can hide that one in the app’s notification settings.
iPhone (iGotify)
- Make sure Gotify, and for External iGotify too, open from outside your home on your public addresses (see Away from home).
- Install iGotify from the App Store. It’s free and needs iOS 17 or later.
- External: type the Gotify Server URL and the iGotify Assistant URL, then sign in as admin.
Local: type the Gotify Server URL, switch on Local Instance, and sign in. The app then shows a Gotify Client Token and a SecNtfy Token. Paste them intoIGOTIFY_CLIENT_TOKENandIGOTIFY_SECNTFY_TOKENin.env, and rundocker compose up -d igotify. - Allow notifications, then send the test message from Step 3 again. It should pop up on your iPhone, even when it’s locked.
Step 5: Connect your apps
Make a separate Gotify app for each thing that sends messages, so you can tell them apart, mute one, or swap its token without touching the others.
Give each app its own icon
Every app starts with the same Gotify gopher, which makes a busy message list hard to read. Give each one its real logo instead:
- Go to Dashboard Icons, a free collection of logos for over 4,000 self-hosted apps.
- Search for the app, for example radarr, and download the PNG.
- In Gotify, click APPS, then the cloud button next to the app, and choose the file you downloaded.
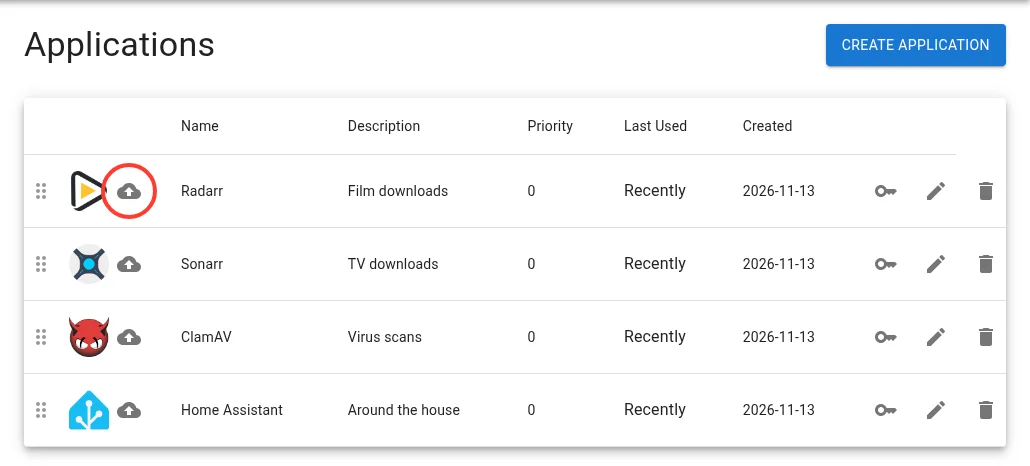
The icon shows straight away, next to every message from that app in the web page and the Android app. The iGotify app only shows icons in External mode.
Radarr and Sonarr
Both have Gotify built in. Go to Settings → Connect → + → Gotify and fill in:
- Gotify Server:
http://your-server-ip:8680 - App Token: the token of a Gotify app called Radarr (or Sonarr)
- Priority: Normal. High makes every download pop up on your screen.
- Tick what you want to hear about, like On Import and On Health Issue, then click Test and Save.
Prowlarr, Bazarr, Lidarr and many other apps have the same Gotify option in their own Connect or Notifications settings.
Home Assistant
Add this to configuration.yaml, restart Home Assistant, and you can send messages from any automation with the rest_command.gotify action:
rest_command:
  gotify:
    url: "http://your-server-ip:8680/message"
    method: POST
    headers:
      X-Gotify-Key: "YOUR_APP_TOKEN"
    content_type: "application/json"
    payload: '{"title": "{{ title }}", "message": "{{ message }}", "priority": {{ priority | default(5) }}}'
Then in an automation, choose rest_command.gotify with title and message. New to Home Assistant? See my Home Assistant guide.
Your own scripts
Anything that can run curl can use Gotify: backups, disk checks, a virus scanner. My ClamAV guide uses it to warn you when a download has a virus in it.
How loud should it be?
Every message has a priority from 0 to 10. On Android it decides how the notification behaves:
- 0: no alert, it just sits in the list.
- 1–3: silent, no sound.
- 4–7: the normal notification sound.
- 8–10: pops up over whatever you’re doing. Keep this for things that really matter, like a virus or a failing disk.
Away from home
At home, your phone reaches Gotify on your server’s address. When you’re out on 4G or 5G it can’t, so Android just waits until you’re back on Wi-Fi. iPhone needs a public address even at home. To fix it, give Gotify a public address. A Cloudflare Tunnel does this without opening any ports on your router. Point a name like gotify.yourdomain.com at port 8680, and for iPhone External, igotify.yourdomain.com at port 8681.
Three things catch people out here:
- Don’t put a login page in front of Gotify. If you use a sign-in gate like Authentik for your other apps, leave Gotify (and iGotify) out of it. The phone apps and Radarr talk straight to Gotify and can’t click through a login page. Gotify has its own password, and every app needs its own token.
- iGotify talks to Gotify inside Docker. In Local mode, keep
GOTIFY_URLS=http://gotify, as the generator writes it. Your public address often doesn’t work from inside a container on the same server, and iGotify just keeps saying “Connection failed”. - Use the public address on the phone, not your home IP. If you set the app up at home with
http://192.168.…, it stops working the moment you leave the house.
If something’s wrong
- “401 Unauthorized” when you send. The app token is wrong, or you pressed the key button and made a new one. Make a new app, copy its token straight away, and put it in Radarr or your script again.
- The password from .env doesn’t work. Gotify only reads it the first time it starts. If the folder already had a database in it, the old password still applies. Sign in with that one, or stop Gotify, delete
gotify.dbin the config folder (you’ll lose your apps and messages), and start it again. - Android messages arrive late, or only when you open the app. Battery saving has put the app to sleep. Set Gotify to Unrestricted in the phone’s battery settings.
- iGotify: “Unable to connect to the remote server”. iGotify can’t reach Gotify. Check
GOTIFY_URLSishttp://gotifyand that both are in the same compose file. Look withdocker logs igotify 2>&1 | grep WebSocket: it should end with “Connected”. - iGotify: “Unauthorized; token rejected by Gotify”. The client token in
.envis wrong or was deleted in Gotify’s CLIENTS page. Sign out of the iGotify app, sign in again, and copy the new tokens. - iGotify asks for a password in its own web page. iGotify makes its own random password the first time it starts and prints it once in its log. Find it with
docker logs igotify 2>&1 | grep -A1 "password generated". The app doesn’t need it. - “Permission denied” in the logs. The config folders don’t belong to your PUID/PGID. Run the
chownline from the Commands tab again.
Updating Gotify
cd ~/gotify
docker compose pull && docker compose up -d
Your apps, tokens and messages are kept, because they live in the config folder, not in the container.
Frequently asked questions
Is there a Gotify app for iPhone?
There is no official one, because iPhones stop apps listening in the background. iGotify fills the gap: a small container on your server passes each message to Apple's push service, and the iGotify app shows it.
Why can't I see my Gotify app token any more?
Gotify 3 only shows an app token once, when you create the app. The key button makes a new token and the old one stops working, so copy it straight away.
Do I need a public address for Gotify?
On Android only if you want messages away from home. On iPhone yes, always, because the iGotify app signs in to Gotify through it. A Cloudflare Tunnel works well.
Does Gotify send my messages to anyone else?
Not on Android: the app talks straight to your server. On iPhone, iGotify sends each message, encrypted, through SecNtfy to Apple's push service, which says it does not store it.
Thank you
Gotify is free and open source, made by volunteers at gotify.net. Thanks also to androidseb25 for iGotify, which makes it work on iPhone. The Gotify logo is by the Gotify project, licensed CC BY 4.0, based on the Go gopher by Renee French. App icons in the screenshots are from Dashboard Icons; each logo belongs to its own project. This site isn’t connected to either project.
Related guides: ClamAV · Radarr · Sonarr · Home Assistant · Cloudflare Tunnel
If this guide helped you, consider buying me a coffee. It helps keep guides like this one coming.
Get new guides by email
About one email a month: new step-by-step guides and card releases. No spam, unsubscribe any time.