
For educational purposes only. This guide shows how to install self-hosted software on your own hardware. I don't condone piracy: only use these apps with media you own or have the right to use, and follow the law where you live. Back up your data first. Full disclaimer
Updated 16 November 2026 Tested with: Cleanuparr 2.11.1
Cleanuparr keeps your Radarr and Sonarr queues moving. It finds downloads that have got stuck, along with fake releases that are really programs, removes them and blocklists them so your app can look for a better copy.
This guide sets up Cleanuparr with Docker Compose in eight short steps, using a safe test mode first. It takes about 20 minutes, plus a day of letting the test mode run.
On this page (15 sections)
- 1Watch: install Cleanuparr with Docker Compose
- 2See how Cleanuparr decides what to remove
- 3What you need to set up Cleanuparr with Docker Compose
- 4Step 1: Make your compose file
- 5Step 2: Create your account
- 6Step 3: Turn on Dry Run
- 7Step 4: Connect your download client
- 8Step 5: Connect Radarr and Sonarr
- 9Step 6: Set up the Queue Cleaner
- 10Step 7: Set up the Malware Blocker
- 11Step 8: Check the results, then turn off Dry Run
- 12Useful extras
- 13If something’s wrong
- 14Updating Cleanuparr
- 15Frequently asked questions
Watch: install Cleanuparr with Docker Compose
The video has subtitles at the bottom and no sound. It was recorded on a clean test install of Cleanuparr 2.11.1 connected to a test qBittorrent and Radarr, with Dry Run switched on first.
See how Cleanuparr decides what to remove
Press Next check to run Cleanuparr against a pretend Radarr queue. Each dot is a strike, and too many strikes gets a download removed. Try it with Dry Run and Reset Strikes on Progress switched on and off. Under the demo is the generator you’ll use in Step 1.
Open the generator full screen
What you need to set up Cleanuparr with Docker Compose
- A computer or NAS running Docker. New to Docker? The Docker install guide covers Windows, Mac and Linux.
- Radarr or Sonarr, and a download client such as qBittorrent.
Step 1: Make your compose file
In the generator, pick your download client and apps. If you use Unpackerr for torrents packed in RAR files, tick the RAR option (Step 7 explains why). Then:
mkdir -p ~/cleanuparr && cd ~/cleanuparrSave compose.yaml and .env there, and run the commands from the Commands tab. Cleanuparr opens at http://YOUR-SERVER-IP:11011. It doesn’t need to go behind Gluetun, because it only talks to your own apps.
Step 2: Create your account
The first visit opens a three-part setup: Account, 2FA and Plex. Choose a username and a password of at least 8 characters, then Continue. For 2FA, scan the code or click Skip for now. Linking Plex is optional too, so click Complete Setup to finish and sign in.
Finish all three parts in one go. Your account is saved at the first part, so if you leave and come back, the page says “Account already exists” and won’t continue (see If something’s wrong).
Step 3: Turn on Dry Run
Dry Run is off on a new install, so do this first. Go to Settings → General, switch on Dry Run Mode, and click Save Settings.

Step 4: Connect your download client
Go to Settings → Download Clients → Add Client. Give it a name, choose the type, and enter its full address with your server’s IP, plus your login. Click Test, then Save. On qBittorrent 5.2 or newer you can use an API key instead of a username and password.
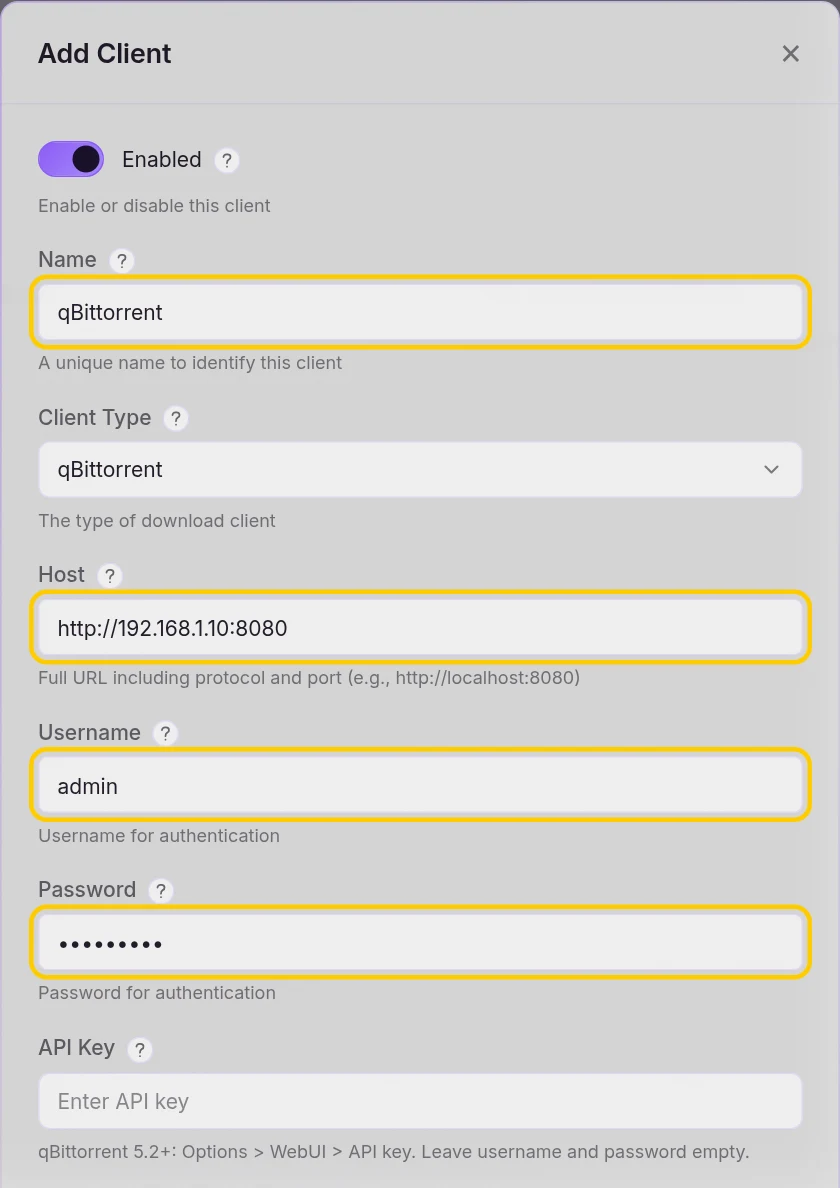
The list has qBittorrent, Deluge, Transmission, uTorrent, rTorrent and SABnzbd. NZBGet wasn’t on it in version 2.10.12.
Step 5: Connect Radarr and Sonarr
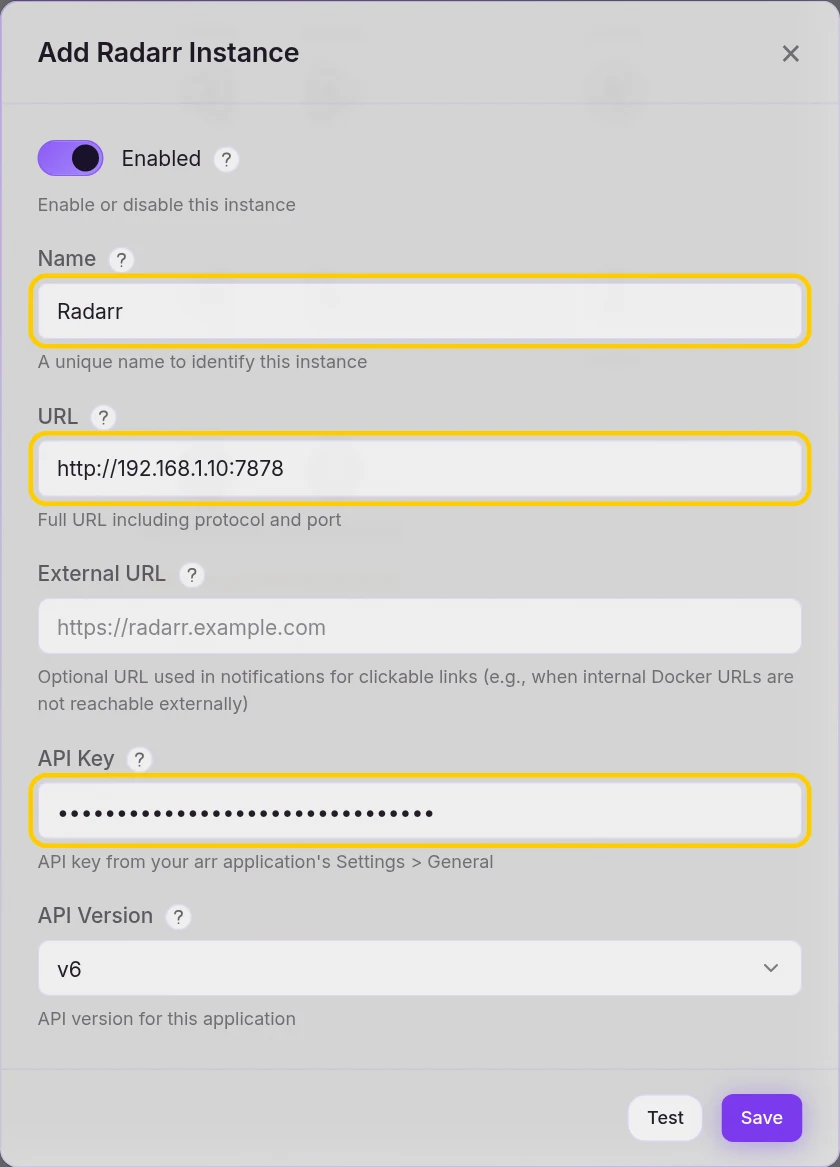
Go to Settings → Media Managers and click Radarr. Enter a name, its address (http://YOUR-SERVER-IP:7878) and the API key from Radarr → Settings → General. Click Test, then Save. Do the same for Sonarr on port 8989.
Step 6: Set up the Queue Cleaner
This is the part that deals with stuck downloads. It runs every 5 minutes and gives anything stuck a strike. Go to Settings → Queue Cleaner, switch on Enabled, and open these sections:
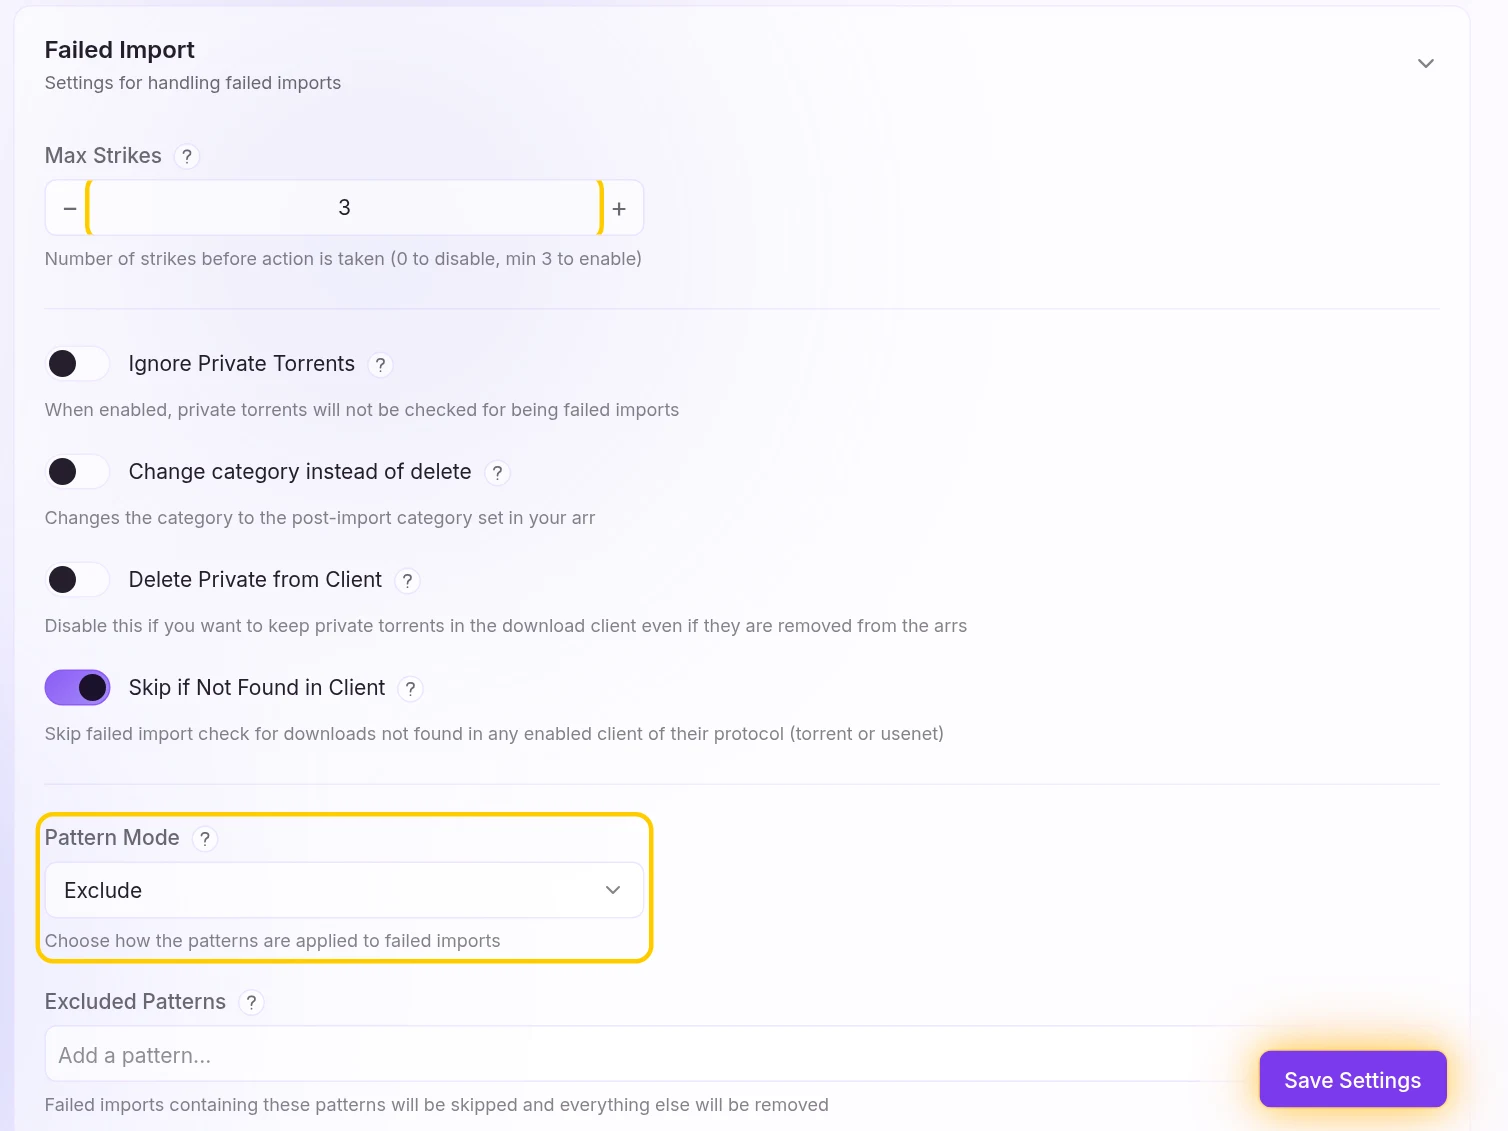
- Failed Import: set Max Strikes to
3, then change Pattern Mode to Exclude. If you leave it on Include with no patterns, the Save button stays greyed out. - Downloading Metadata: set Max Strikes to
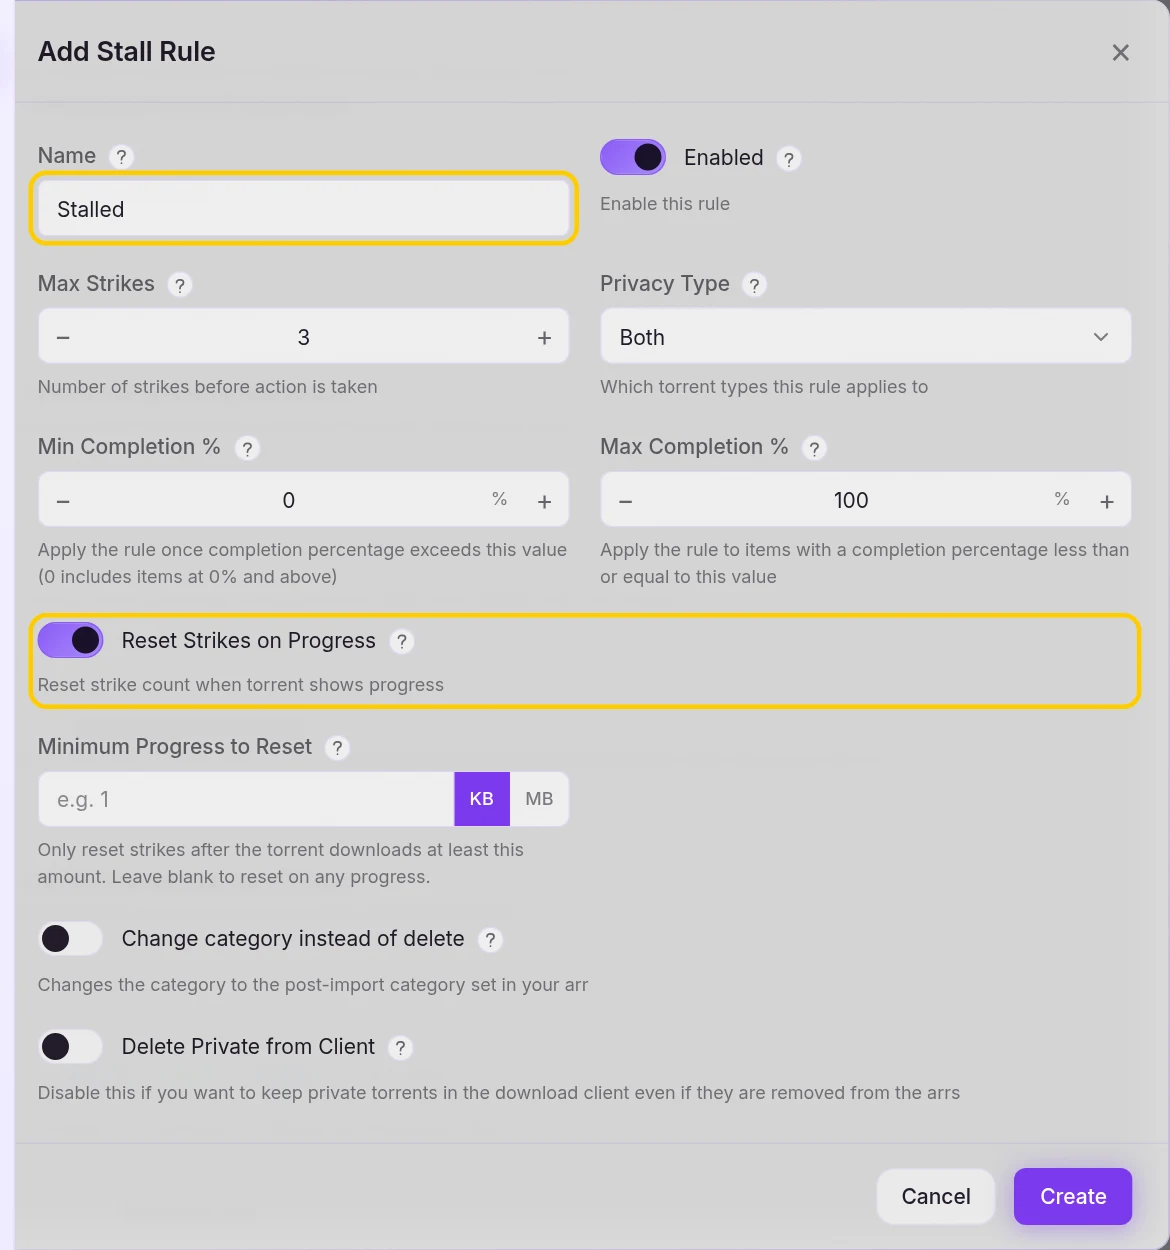
6. That gives a magnet link about 30 minutes to get going. 3 strikes (15 minutes) can be too tight through a VPN. - Stalled Download Rules: click Add Stall Rule. Name it, leave Max Strikes at
3, switch on Reset Strikes on Progress, and click Create. This setting is off by default, so a slow download that’s still moving could be removed without it.
Click Save Settings at the bottom. Stall rules save as soon as you click Create, but the rest of the page doesn’t.
Step 7: Set up the Malware Blocker
This catches fake releases: a “film” that’s really a .exe or .lnk. It checks every 5 seconds, and it doesn’t use strikes. If every file in a download matches the list, the download is removed straight away. If only some match, those files are set not to download and the rest carries on.
Go to Settings → Malware Blocker and switch on Enabled. Open Arr Blocklists, switch on each app you use, and fill in Blocklist Path with one of these:
- Cleanuparr’s official list (about 850 patterns):
https://raw.githubusercontent.com/Cleanuparr/Cleanuparr/refs/heads/main/blacklist - The short list, if you ticked the RAR option in the generator:
/config/blocklist.txt. The generator’s Commands tab creates it.
.rar and .zip. In a test, a torrent packed in RAR files was removed and blocklisted within seconds. If you rely on Unpackerr, use the short list. It removed a fake .exe in the same test and left the RAR release alone.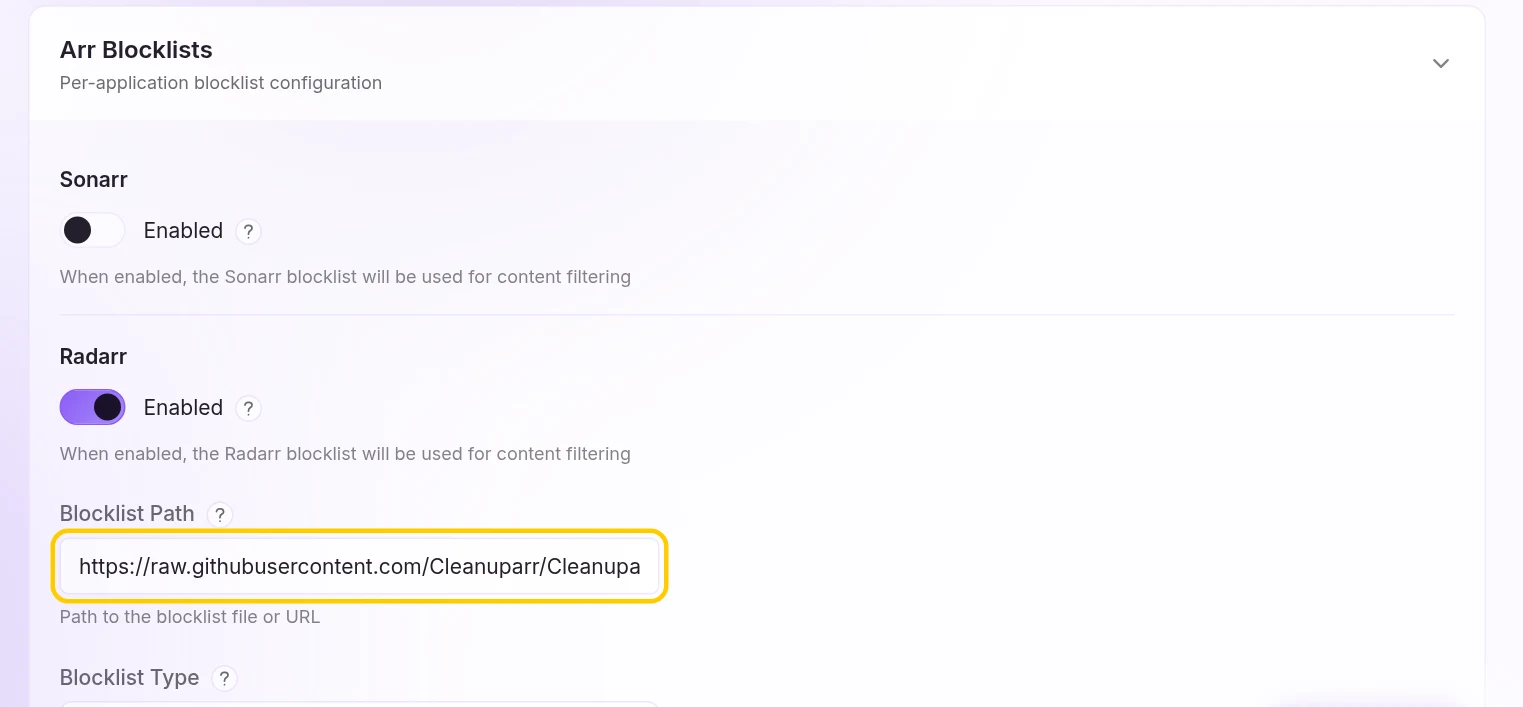
Step 8: Check the results, then turn off Dry Run
Leave it for a day, then look at Strikes and Logs in the side menu. Lines starting [DRY RUN] show what it would have done.
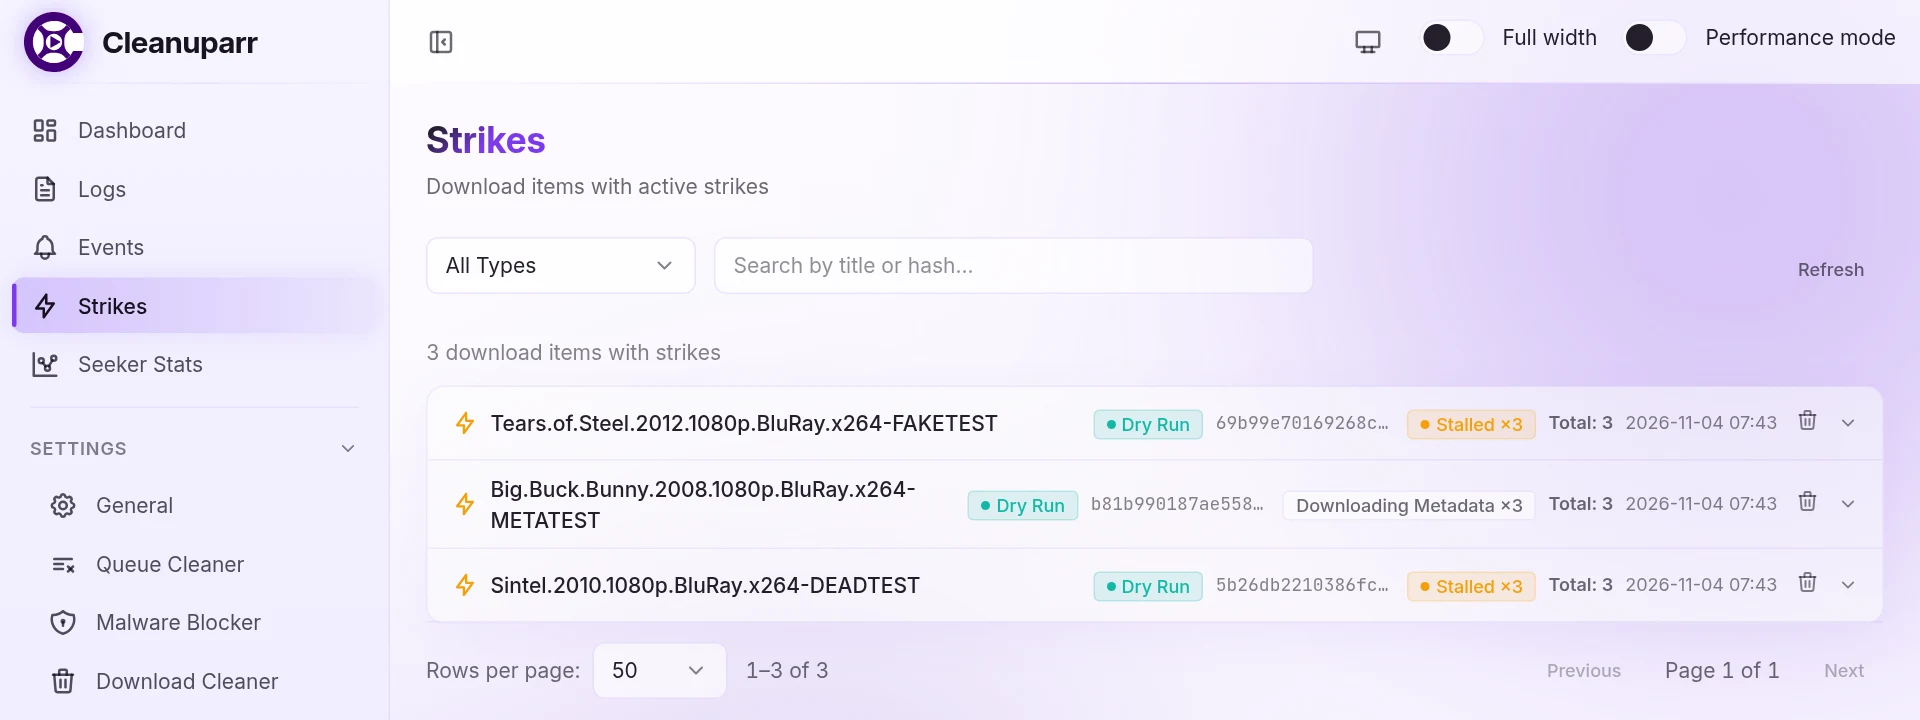
Happy with what you see? Go back to Settings → General, switch off Dry Run Mode, and save. Dry Run’s strikes are wiped when you do this, so the count starts again from zero.
From then on, a removed download is also blocklisted in Radarr or Sonarr, and Cleanuparr’s Seeker asks the app to search for a replacement the next time it runs (every 10 minutes by default). That’s switched on already, under Settings → Seeker.
Useful extras
- Downloads only run at night? Paused downloads look stalled. In the Queue Cleaner, switch on Advanced Scheduling and match your hours. For example,
0 0/5 0-6 * * ?runs every 5 minutes from midnight until 7am. - Internet drops now and then? In Settings → General, switch on Internet Connectivity Check and add a few URLs. The Queue Cleaner then skips its run if none of them answer, so an outage doesn’t earn strikes.
- Does your torrent site track how much you share? Removing a torrent early can count against your account. Set the stall rule’s Privacy Type to Public, and switch on Ignore Private Torrents under Failed Import.
- Download Cleaner is a separate, optional page for seeding rules and leftover files. Get everything above working first. Some of its features need your downloads folder mounted, which the generator can add.
If something’s wrong
- “Account already exists” during setup. Setup wasn’t finished in one go. A new install has nothing to lose, so start again:
docker compose down, delete everything inside yourcleanuparrconfig folder, thendocker compose up -d. - Save Settings is greyed out. Look for a red message on the page. On the Queue Cleaner, it’s usually Pattern Mode (Step 6).
- “A stall rule with this name already exists”. Your rule saved when you clicked Create. Close the window.
- Test fails on a client or app. Use your server’s IP, not
localhost, because Cleanuparr runs in its own container. Check the port and the API key. - Good downloads are being removed. Turn Dry Run back on, then raise Max Strikes, or look at the Failed Import patterns. Slow public torrents may need longer.
- RAR-packed releases keep disappearing. That’s the official blocklist (Step 7). Use the short list.
- A download with a
.exeis still there. If it also has a real film, only the.exeis skipped and the film carries on. That’s normal.
Updating Cleanuparr
cd ~/cleanuparr
docker compose pull && docker compose up -d
I tested this guide on version 2.10.12. Cleanuparr changes quickly, so menus may move a little in later versions.
Frequently asked questions
What does Cleanuparr do?
It keeps your Radarr and Sonarr queues moving. It finds stuck downloads and fake releases that are really programs, removes them and blocklists them so your app looks for a better copy.
Will Cleanuparr delete downloads I want?
It can if a setting is wrong, which is why this guide turns on Dry Run first. In Dry Run it only logs what it would have done. Check the log for a day before turning it off.
Why are good downloads being removed?
Turn Dry Run back on, then raise Max Strikes or check the Failed Import patterns. Slow public torrents may need longer.
Why do RAR-packed releases keep disappearing?
The official blocklist removes them. Use the short list in the Malware Blocker instead, or add Unpackerr to unpack them.
Thank you
Cleanuparr is free and open source, made by the Cleanuparr team. The blocklists are theirs too.
Related guides: Media Server Stack · Radarr · Sonarr · qBittorrent
If this guide helped you, consider buying me a coffee. It helps keep guides like this one coming.
Get new guides by email
About one email a month: new step-by-step guides and card releases. No spam, unsubscribe any time.