
For educational purposes only. This guide shows how to install self-hosted software on your own hardware. I don't condone piracy: only use these apps with media you own or have the right to use, and follow the law where you live. Back up your data first. Full disclaimer
Updated 16 November 2026 Tested with: Jellyfin 12.4.0
Jellyfin turns your films and TV shows into your own Netflix, like Plex, but completely free and open source. There’s no account to sign up for, nothing is sent to anyone else’s servers, and features Plex charges for (like hardware transcoding) cost nothing.
This guide sets up Jellyfin with Docker Compose in six short steps, including hardware transcoding so it runs smoothly when several people watch at once. It takes about 15 minutes.
On this page (14 sections)
- 1Watch: install Jellyfin with Docker Compose
- 2See which boxes to tick
- 3What you need to set up Jellyfin with Docker Compose
- 4Step 1: Make your compose file
- 5Step 2: Start it
- 6Step 3: Create your admin user
- 7Step 4: Add your libraries
- 8Step 5: Turn on hardware transcoding
- 9Step 6: Install the apps
- 10Connect Radarr and Sonarr (optional)
- 11Watching away from home
- 12If something’s wrong
- 13Updating Jellyfin
- 14Frequently asked questions
Watch: install Jellyfin with Docker Compose
The video has subtitles at the bottom and no sound. It was recorded on a clean test install with a simple compose file; the generator below adds hardware transcoding. The test film is Big Buck Bunny © Blender Foundation, peach.blender.org, licensed under Creative Commons Attribution 3.0.
See which boxes to tick
When a device can’t play a file as it is, Jellyfin has to transcode it (convert it on the fly). A graphics chip does that far more easily than the CPU, but Jellyfin asks you which video types your chip can handle, and ticking the wrong ones makes playback fail. Pick your graphics, a device and a file to see what happens and which boxes to tick. Try the Intel 7th–10th gen with the web browser and the AV1 film. Under the demo is the generator you’ll use in Step 1.
Open the generator full screen
What you need to set up Jellyfin with Docker Compose
- A computer or NAS running Docker. New to Docker? The Docker install guide covers Windows, Mac and Linux.
- Your films and TV in folders. If you use Radarr and Sonarr, that’s
/data/media/moviesand/data/media/tv. - That’s it. No account needed.
Step 1: Make your compose file
In the generator, keep Bridge (ports) and choose your hardware transcoding: Intel / AMD for most mini PCs and NAS boxes, NVIDIA if you have a GeForce, Quadro or RTX card, or None. Then on your server:
- Make a folder and go into it:
mkdir -p ~/jellyfin && cd ~/jellyfin - Save compose.yaml and .env from the generator there.
Jellyfin gets only your /data/media folder. It needs to read your films and shows, but not your downloads.
Step 2: Start it
Run the commands from the generator’s Commands tab. The important one is:
docker compose up -dThen open http://YOUR-SERVER-IP:8096. You’ll see Welcome to Jellyfin! Give the server a name you’ll recognise, like “Home”, choose your language, and click Next.
Step 3: Create your admin user
Pick a username and a password. Jellyfin needs a password for admin accounts, and you’ll use this login on every device. You can add more users for the rest of the household later in Dashboard → Users.
Step 4: Add your libraries
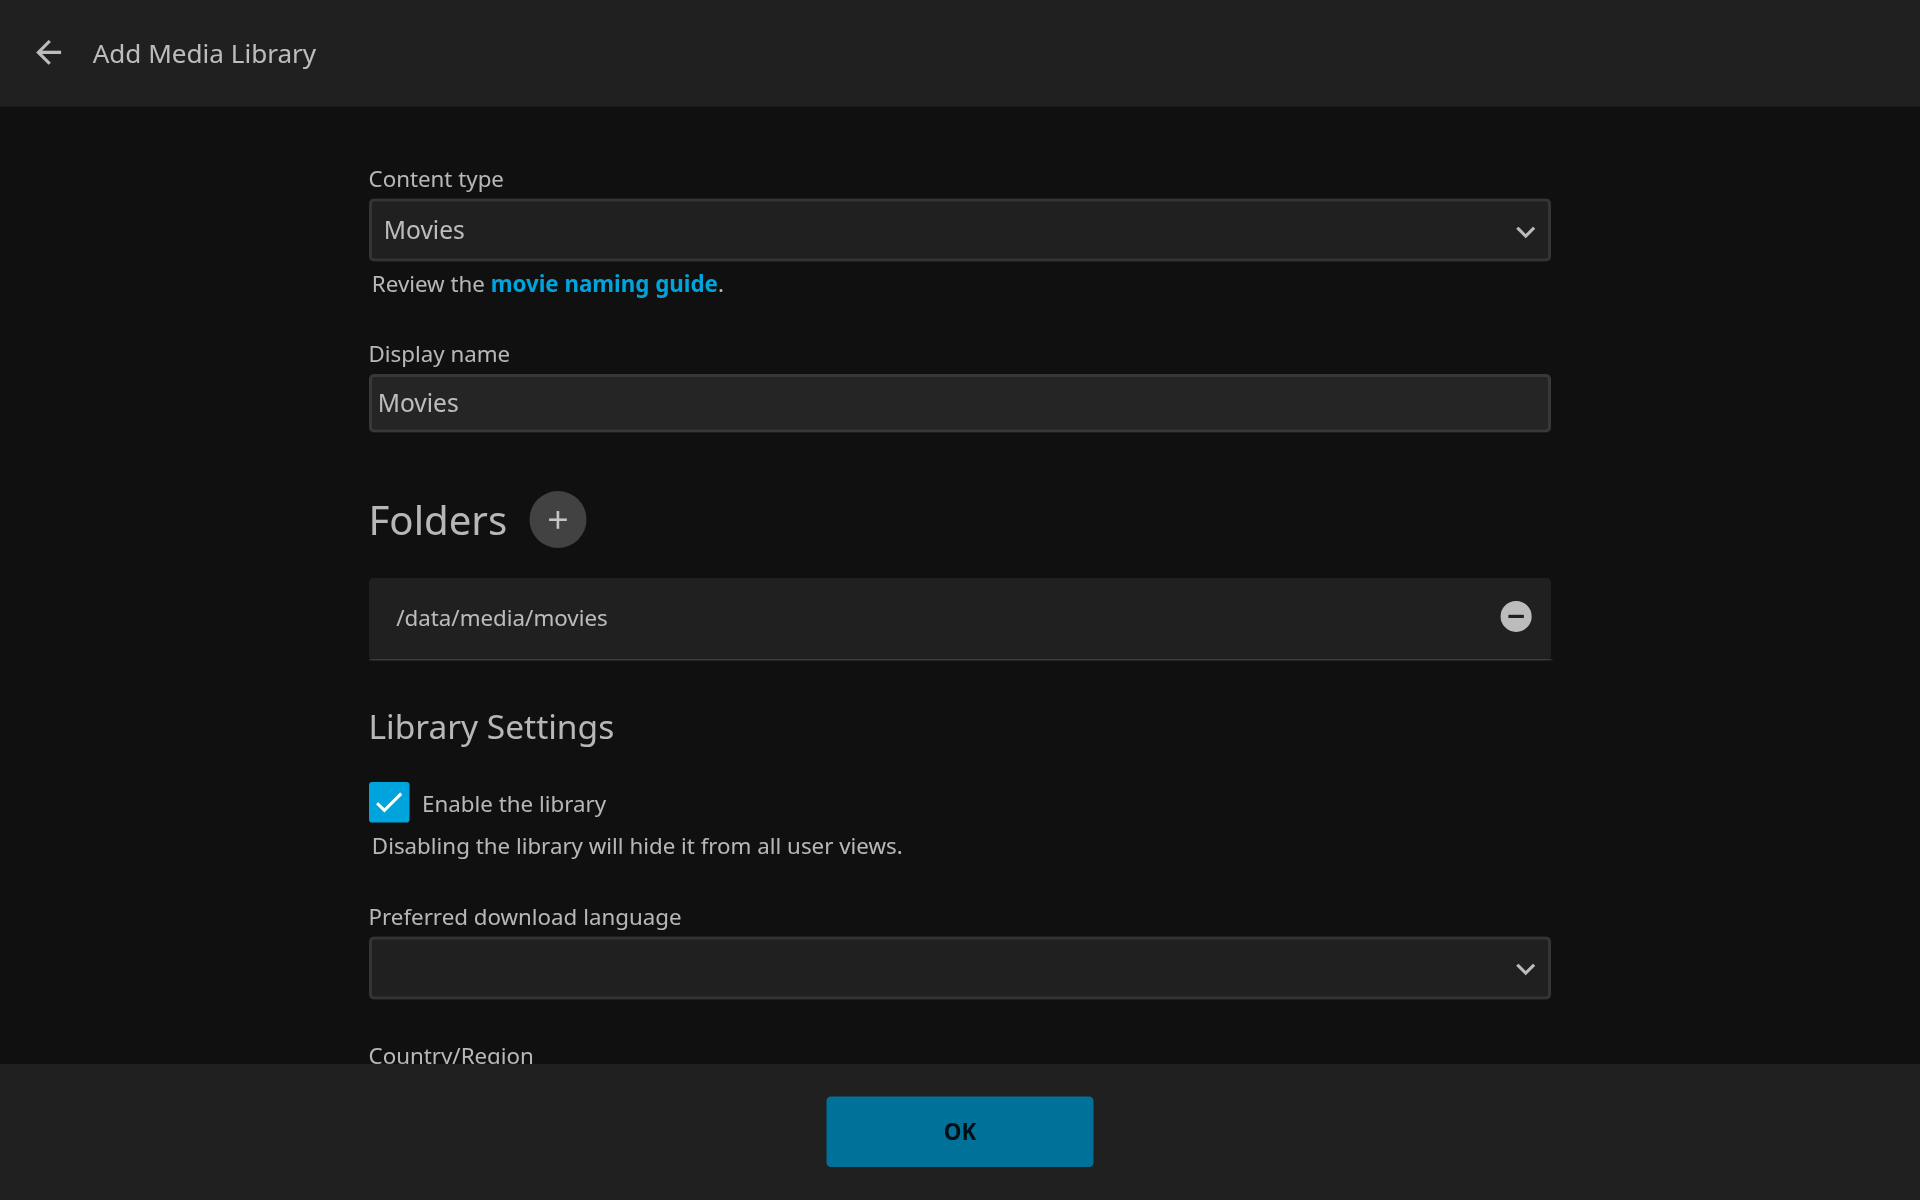
- Click Add Media Library and set Content type to Movies.
- Click the + next to Folders, type
/data/media/moviesand click OK, then OK again. - Do the same with Shows and
/data/media/tv. - Click Next through the language and Set up Remote Access pages (the defaults are fine), then Finish.
Jellyfin scans the folders and fetches artwork and descriptions. A big library can take a while the first time.
Step 5: Turn on hardware transcoding
Skip this if you chose None in the generator. The generator’s Jellyfin settings tab lists exactly what to set for your choice.
- Sign in, click your profile picture, then Dashboard. Go to Playback → Transcoding.
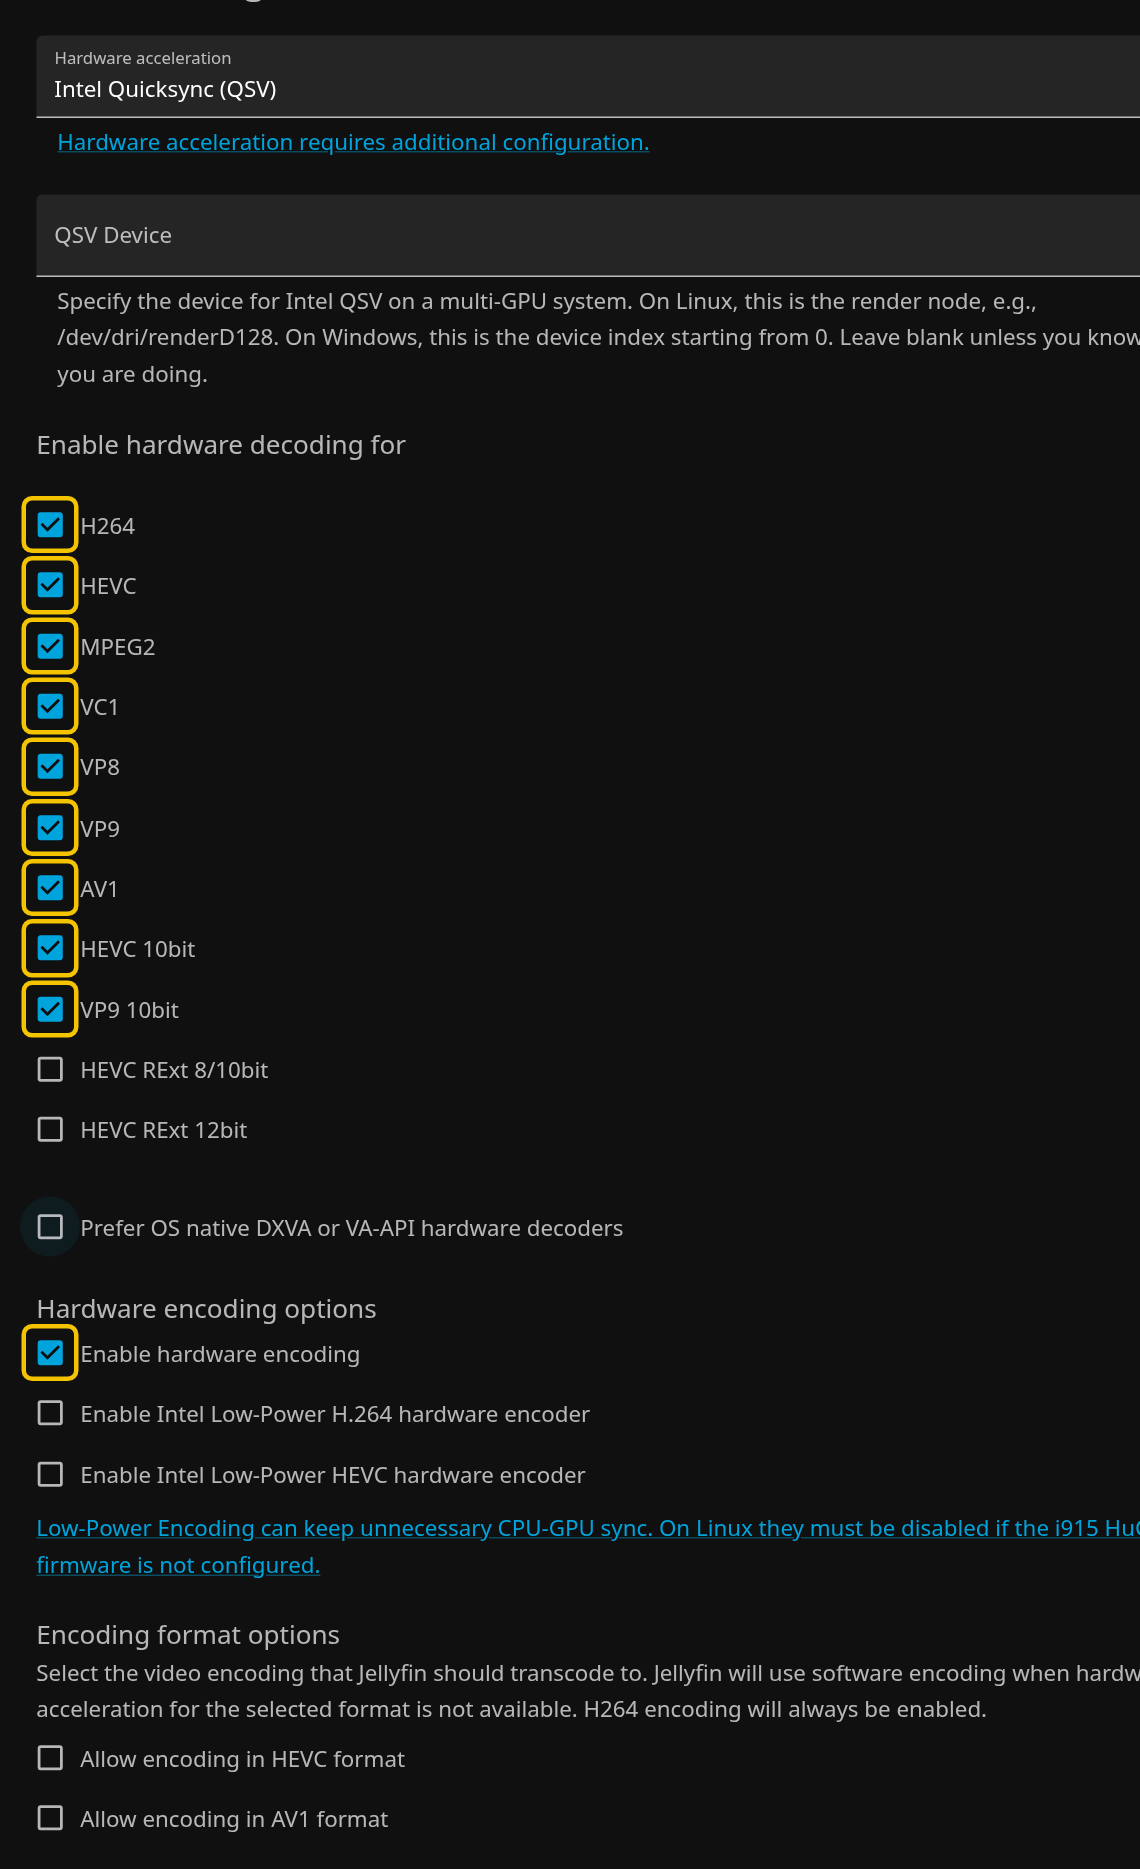
- Set Hardware acceleration to Intel Quicksync (QSV) for Intel, Video Acceleration API (VAAPI) for AMD, or Nvidia NVENC.
- Under Enable hardware decoding for, tick the boxes your chip supports (the demo shows them). Leave AV1 off on Intel chips older than 11th gen and NVIDIA cards older than the RTX 30 series.
- Tick Enable hardware encoding and Enable Tone mapping. On Intel, leave the two Low-Power encoders off.
- If you ticked Transcode in RAM, set Transcode path to
/transcode. - Click Save at the bottom of the page.
Check it works: play a film and lower the quality in the player (the cog icon) to 720p, which forces a transcode. Then run the last command from the generator’s Commands tab. It prints h264_qsv or h264_nvenc when the GPU is doing the work. I tested this with an NVIDIA GTX 1660: a 4K HDR film was decoded, tone mapped and re-encoded entirely on the card.
Step 6: Install the apps
Jellyfin has free apps for Android, iPhone and iPad, Android TV, Fire TV, Roku, LG and Samsung TVs, and more. Find them at jellyfin.org/downloads. When an app asks for a server, enter http://YOUR-SERVER-IP:8096 and sign in with the user from Step 3.
Connect Radarr and Sonarr (optional)
Jellyfin notices new files on its own, but you can make new films and episodes appear straight away.
- In Jellyfin, go to Dashboard → API Keys, click New API Key, name it “Radarr” and click Create. Copy the key.
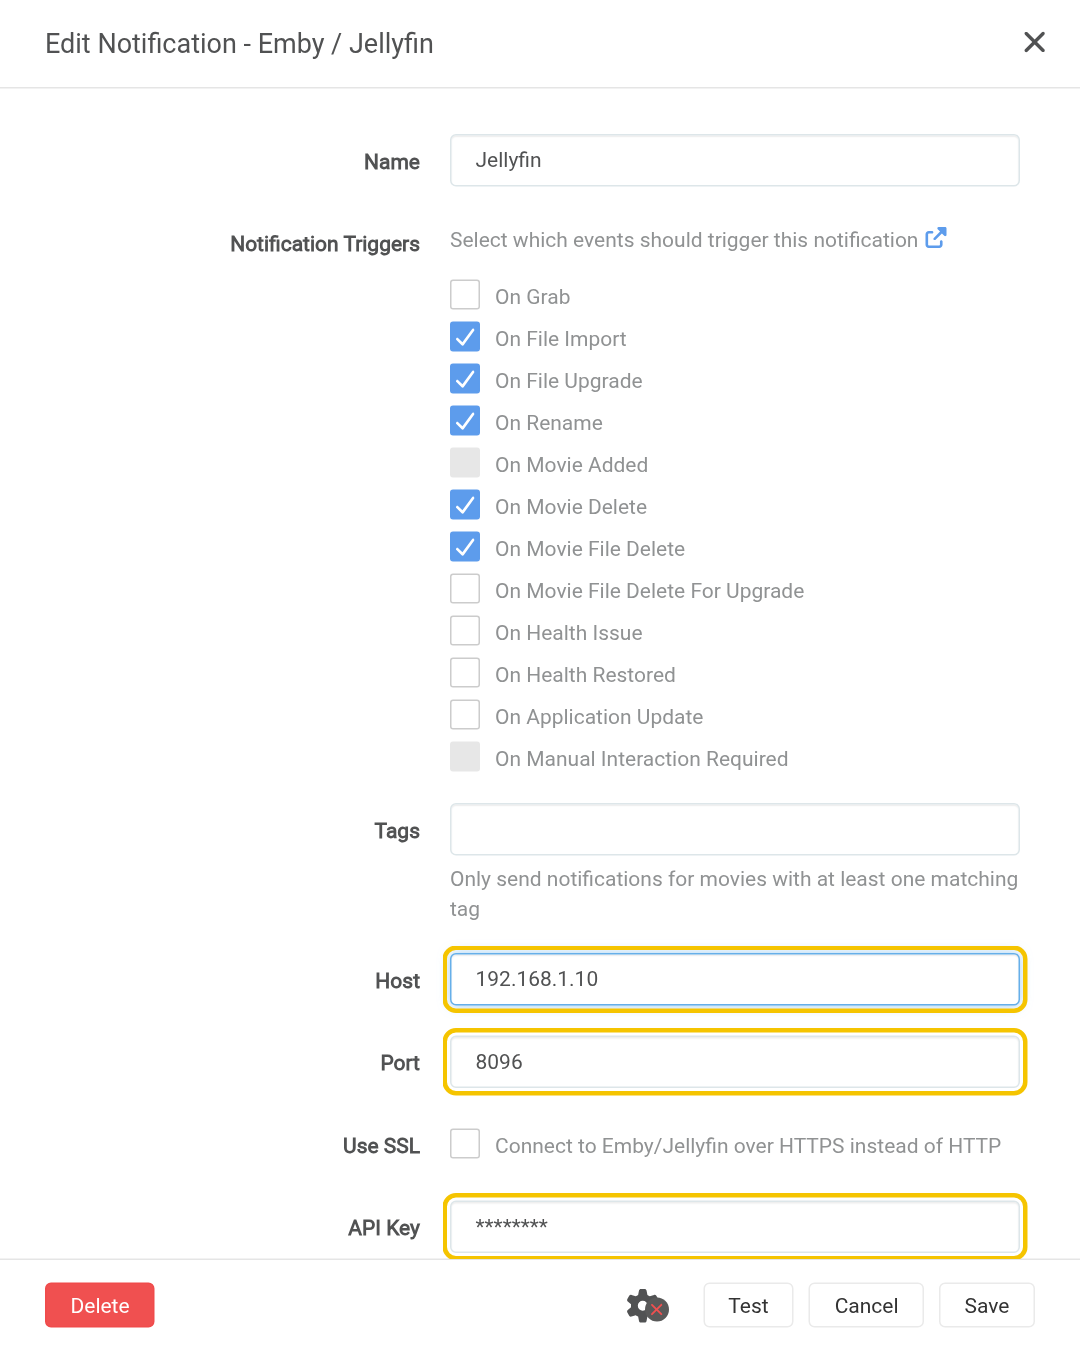
- In Radarr, go to Settings → Connect → + → Emby / Jellyfin.
- Enter your server IP as Host,
8096as Port, and paste the API Key. Keep Update Library ticked. - Click Test, then Save. Do the same in Sonarr with a second key.
Watching away from home
Jellyfin has no built-in relay like Plex, so don’t just open port 8096 on your router: it’s plain HTTP. The simplest safe option is a VPN to your home network, such as Tailscale or WireGuard, then use the same server address as at home. Don’t put Jellyfin behind a Cloudflare Tunnel either, as streaming video through it breaks Cloudflare’s terms.
If something’s wrong
- A library is empty. Check the folder path, and that the PUID/PGID in
.envcan read your media folders. - Playback fails after turning on hardware acceleration. You’ve probably ticked a codec your chip can’t decode (often AV1 or HEVC RExt). Untick it, click Save and try again.
- Videos buffer. Check the transcode log (Commands tab) while it plays. If it doesn’t mention your GPU, hardware transcoding isn’t working: check the device is passed into the container (
ls -l /dev/driordocker exec jellyfin nvidia-smi). - HDR films look washed out on a normal screen. Tick Enable Tone mapping in Step 5.
- A TV app can’t find the server. Type
http://YOUR-SERVER-IP:8096into it, or switch the generator to Host network.
Updating Jellyfin
cd ~/jellyfin
docker compose pull && docker compose up -d
Frequently asked questions
Is Jellyfin really free?
Yes. There is no account and no subscription, and hardware transcoding, which Plex charges for, is included. Nothing is sent to anyone else's servers.
Can I run Jellyfin and Plex at the same time?
Yes. They can both read the same media folders side by side. Jellyfin uses port 8096 and Plex uses 32400, so they don't clash.
Do I need a graphics card for Jellyfin?
No. If your devices can play your files as they are, the CPU is enough. For transcoding, the graphics built into most Intel chips (including the N100) handle several streams at once. A separate NVIDIA card is optional.
Why does playback fail after I turn on hardware acceleration?
You have probably ticked a codec your chip can't decode, often AV1 or HEVC RExt. Untick it in Dashboard → Playback → Transcoding, click Save and try again.
How do I watch Jellyfin away from home safely?
Use a VPN to your home network, such as Tailscale or WireGuard. Don't open port 8096 on your router, because it is plain HTTP, and don't stream through a Cloudflare Tunnel, because that breaks Cloudflare's terms.
Thank you
Thanks to the Jellyfin volunteers for a great free media server, and to LinuxServer.io for the Docker image this guide uses.
Related guides: Plex, Radarr, Sonarr.
If this guide helped you, consider buying me a coffee. It helps keep guides like this one coming.
Get new guides by email
About one email a month: new step-by-step guides and card releases. No spam, unsubscribe any time.